
Ceramic Handbook
Section outline
-

Kilns and Firing
When clay is fired with a well paired glaze to maturity temperature, they become durable ceramics. Variables which affect the appearance of ceramics and the overall studio practice of a ceramicist include: clay body, glaze, type of kiln, type of fuel, kiln loading style, and kiln program. Typical kilns for firing ceramics include an electric kiln, a gas kiln, a wood kiln and a Raku kiln. The choice of a kiln type, and the firing method have a significant effect on the final result.
Electric Kiln Firing
There are several different types of kilns and ways of firing, but all kilns have some basic elements in common: a heat source, a highly insulated refractory structure, and a way of controlling air intake. The only exceptions include traditional ways of firing at low temperatures in the ground with found materials from the environment, such as in pit firing. The kiln is loaded by creating a structure of kiln furniture known as shelves and posts. The following are the most common types of kiln firings today.
Electric kilns are the most common type of kiln used today in Finland. Electric kilns are manufactured in different sizes, are very reliable, considerably more sustainable, and require very little knowledge of firing science. These factors make them very popular with all ceramicists from hobbyists to scientists and to professional potters. With what they lack is the realm of variety and surprises that atmospheric firing brings, such as gas reduction, wood firing, or raku. Electric kilns are quite straightforward and easy to use, requiring far less time, manual labor, and maintenance.
Electric ceramic kilns are very simple - they are metal boxes, either square or round and front-loading or top-loading, lined with soft, porous, highly insulating bricks. Electric kilns are powered by electricity which passes through metal coils called elements along the interior walls. These elements are the most frequent piece of an electric kiln requiring maintenance and need to be changed every so often.
The second most common maintenance involves the kiln shelves. The shelves should be covered with kiln wash to be protected from glaze drips. After several firings, the kiln wash starts to flake and chip. This old layer of kiln wash should be scraped and reapplied or patched.
Kiln Programming and Loading
Electric kilns are either fired manually or with an electronic control pad. Modern electric kilns with electric control pads can control each stage of a kiln program, including cooling, accurately.
The firing program is divided into stages in which the rate of increase of the kiln temperature is adjusted in each stage, so that the objects stacked in the kiln can withstand the temperature rise without breaking. The principle is that the temperature is raised more slowly at the beginning of the firing and the heating rate can be increased gradually, as the temperature in the kiln rises high enough (and has passed both cristobalite and quartz inversion). A typical ceramic firing involves 2–3 steps and a final soaking. The soaking means that the final temperature is reached and maintained in the end for a set amount of time. This allows the temperature in the kiln to stabilize, the objects in the kiln have time to all reach the desired temperature and the chemical reactions during firing have time to take place. Kiln manufacturers also recommended that it's better to slow down the firing a bit before reaching the final temperature so that the firing results will be more even, and the heating elements last a much longer time, as seen in the high fire glaze program below.
Some very basic examples of ceramic firing programs.
Bisque firing:
Stage 1: 50 °C/h until 250 °C
Stage 2: 100 °C/h until 600 °C,
Stage 3: 200 °C/h until 900 °C.Low glaze firing:
Stage 1: 100 °C/h until 250 °C,
Stage 2: 150 °C/h until 600 °C,
Stage 3: 200 °C/h until 1020 °C.
Soaking: 10–20 min.
High glaze firing:
Stage 1: 100 °C/h until 250 °C,
Stage 2: 150 °C/h until 600, °C,
Stage 3: FULL until 1100 °C,
Stage 4: 150°C/h until 1200–1250 °C.
Soaking: 10–20 min.
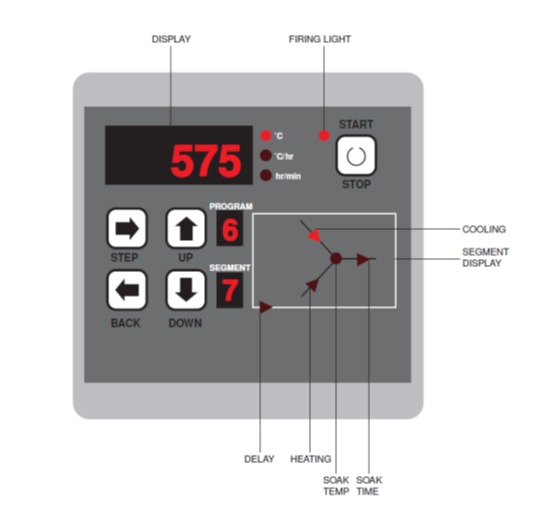
Figure 1. Kiln control pad by Stafford Instruments for Kerako Kilns. Most common at Aalto University. The image shows the basic button functions.
Kiln loading structure and safety
Figure 2: Electric kiln loading process.
1. Kiln type: Kerako electric kiln top-loading model.
2. The kiln can be loaded when it is room temperature, or cool enough to load safely.
3. The heating elements line in rows inside the kiln, and there should be no debris or shards on them or other damage.
4. Three very short posts are placed on the very base of the kiln before any shelves.
5. The first shelf is set on top of them, and then in the following layers, the posts are placed exactly “in the same spot” as in the layer below. The posts should be placed before any ceramic pieces.
6. Pieces of similar height should be placed on each level, maximizing the efficient kiln loading.
7–9. The structure of three posts is repeated with each new shelf layer until the kiln is full.
10. Before closing the lid, make sure none of the pieces are too high or they will be crushed.
11. Close lid, check program and start kiln. Make sure there are no flammable materials in the kiln.When loading a kiln, first check that there is no visible damage to the kiln, such as ceramic pieces or glaze from previous firings in the kiln heating elements (metal coils). If there are a lot of loose pieces in the grooves supporting the elements or on the bottom of the kiln, you should remove the pieces or vacuum the kiln before use. The kiln should be cleaned each time after use to prevent random debris from falling on glaze pieces and to keep the kiln firing accurately.
Before loading the kiln, make sure that the kiln equipment or furniture you need (shelves and posts) are intact and free of glaze residues or visible damage. The top surface of the kiln shelves and the ends of the posts are treated with a kiln-wash, which protects and prevents glaze from sticking to the kiln shelf and facilitates the cleaning of the kiln shelves. Kiln-wash usually consists of half Kaolin and half Alumina Oxide, basically a paintable refractory coating, mixed with water to the consistency of a glaze. The kiln-washed shelves should always be dry before using them in the kiln. One should be careful of flaking kiln wash, as it can come off in the kiln and fuse to a glazed piece, leaving an unattractive blob. The kiln equipment and furniture are made of a highly refractory material, but is very fragile, so handle them with care.
Never wipe the kiln shelves with bare hands, as it is common for broken pieces to become sharp and glass-like on the surface. It is best to grind off any glaze drips or stuck pieces with a grindstone. Protective gloves, goggles and respirator should be worn when grinding kiln shelves to protect eyes and skin from ceramic shards and avoiding breathing dust.
The goal is always to fire the kiln as full and efficiently as possible. When loaded to full capacity, the kiln firing uses less energy, and the temperature is more even throughout the kiln.
The kiln is loaded with a repeated structure of layers to optimize space and firing accuracy. The stacking pattern is started by placing three support posts on the bottom of the kiln that will line up with the edge of the kiln shelf placed on top and create a stable base. On the next layer, the three support posts are placed at the same points on the shelf. The same pattern of posts between shelves continues each layer to create a strong and consistent weight-bearing structure throughout the kiln stacks.
Objects in the kiln must not touch any part of the kiln, including the elements, posts or kiln walls. For a bisque firing, objects may be carefully nested or stacked. But objects in a glaze firing should never touch or they will fuze together. After loading the kiln, make sure that the kiln lid or door can be closed without touching the objects.
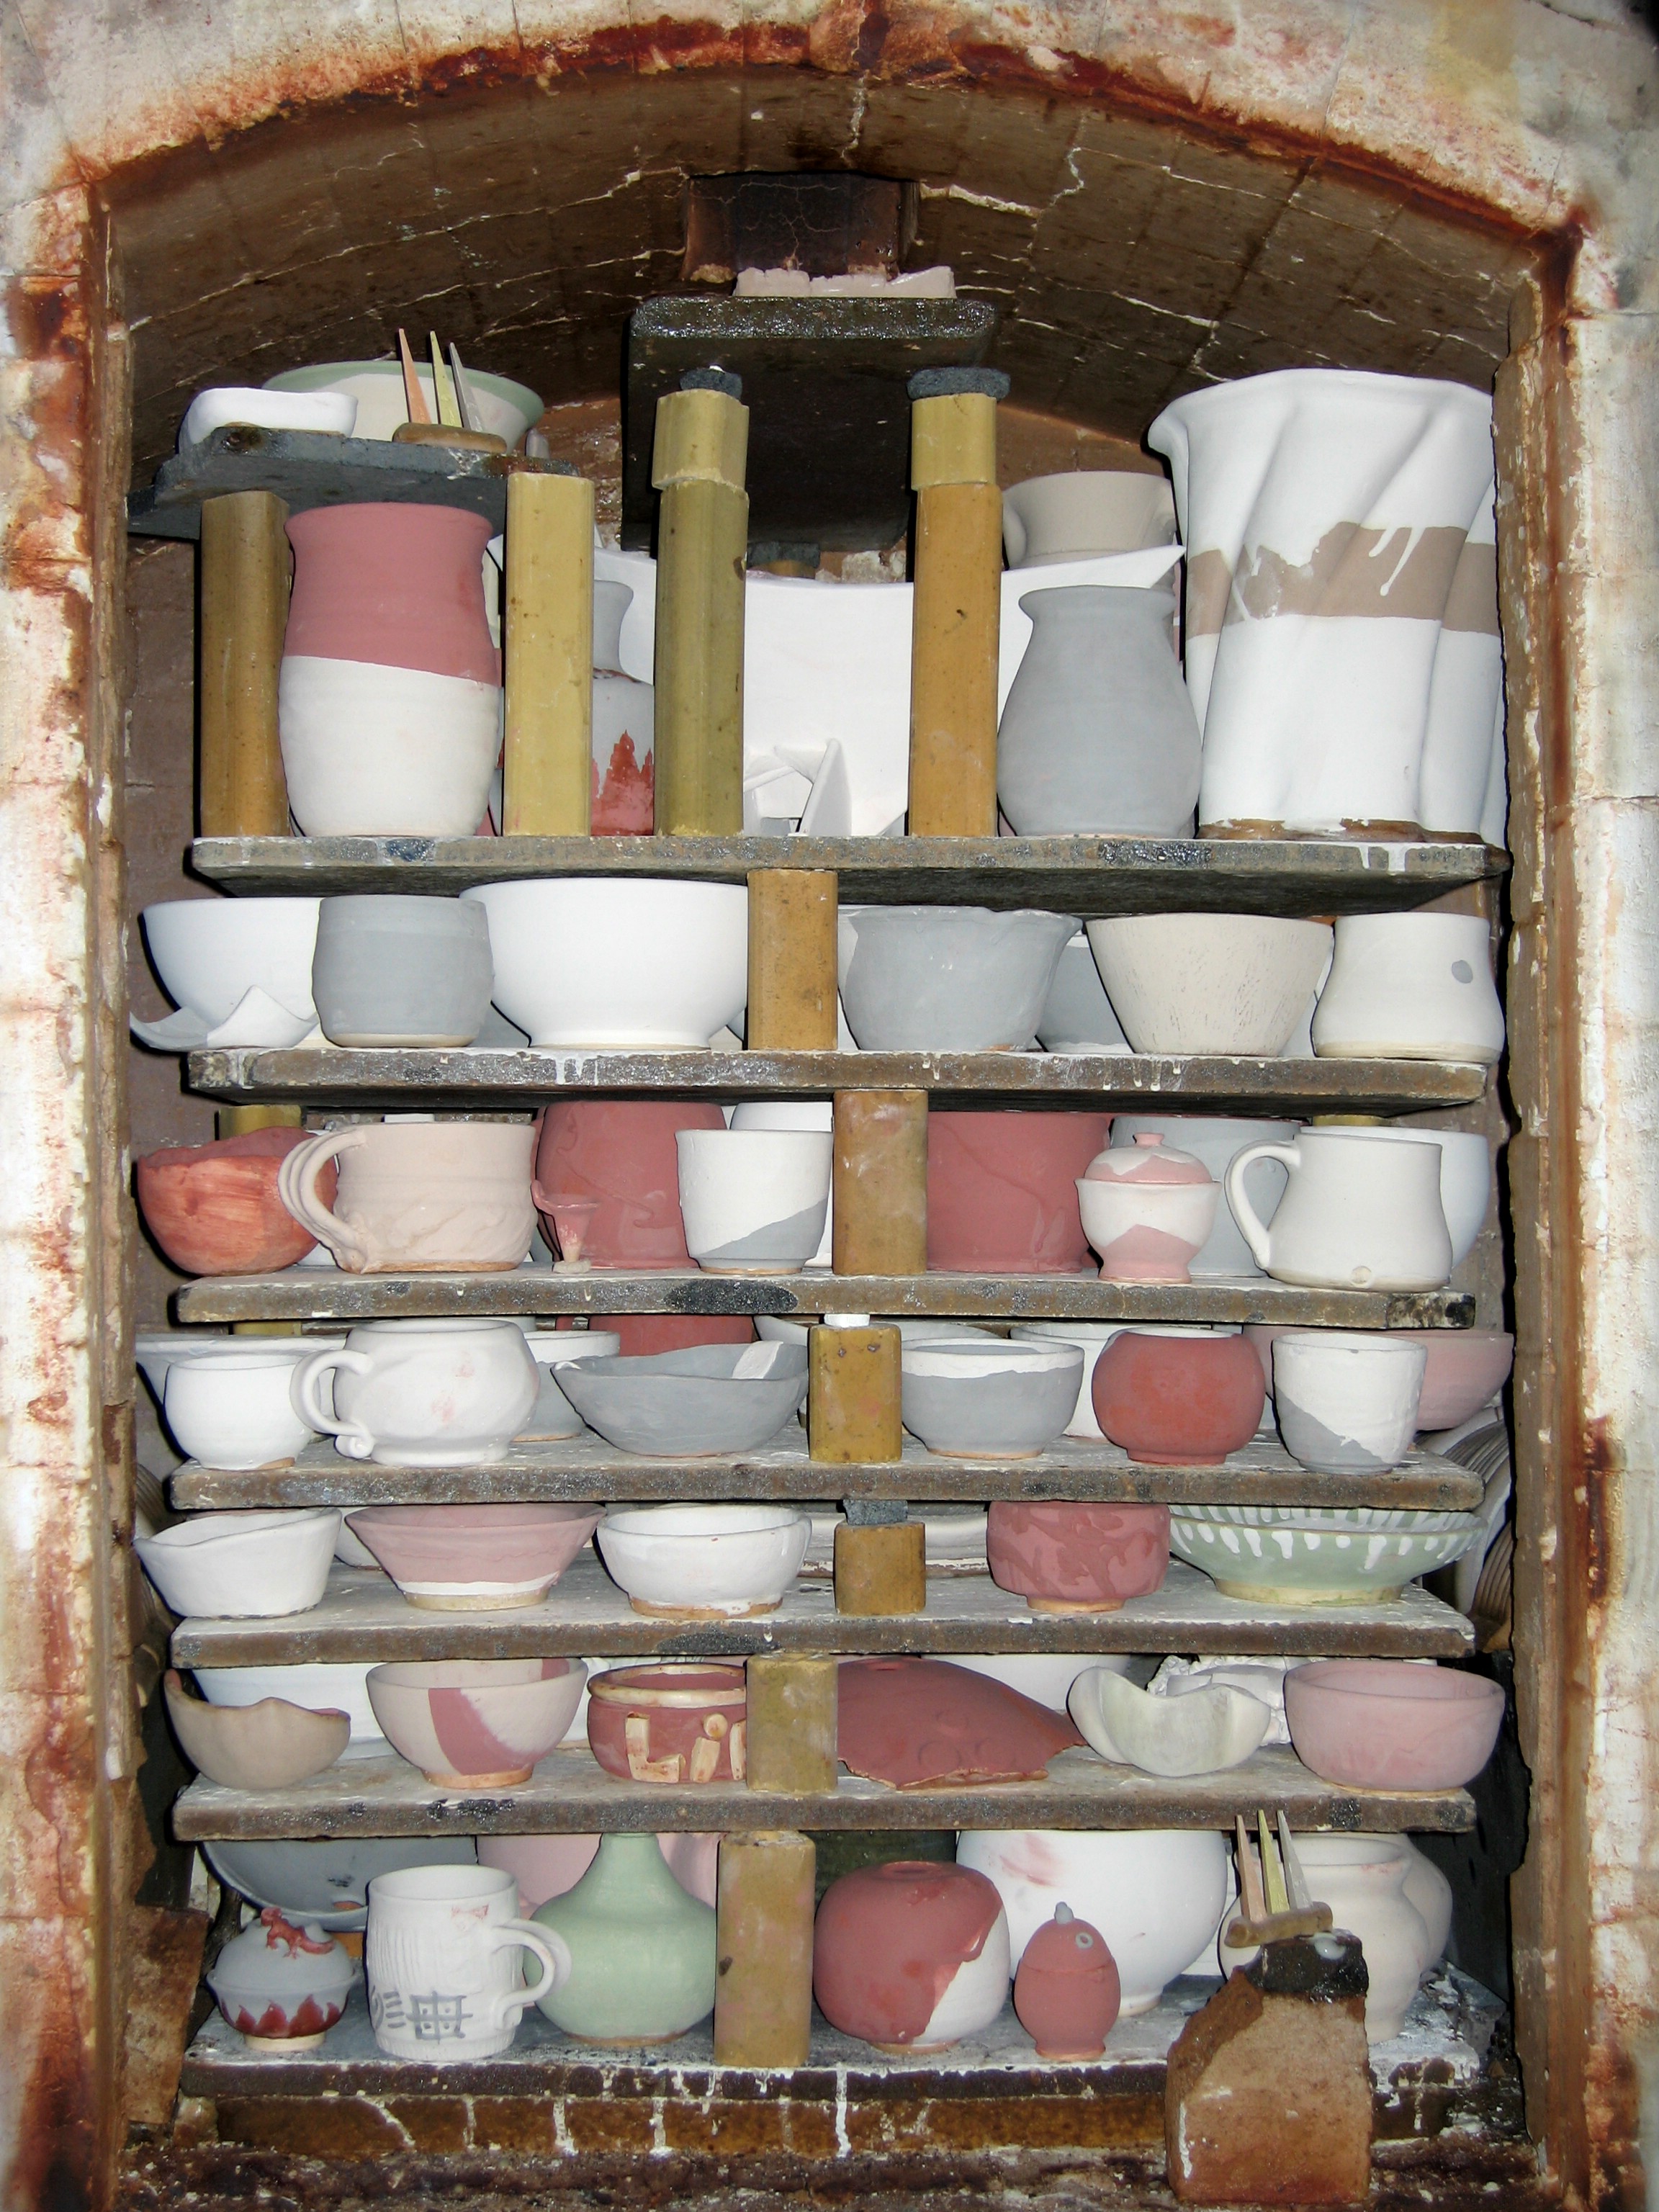
Figure 3. Fully packed gas kiln before firing with cone packs at the top left and bottom right.
Important stages of firing and temperatures
Below is a brief outline of important firing temperatures and the chemical changes that are happening to ceramics during the process of heating and cooling. These steps and benchmarks should be kept in mind when creating kiln programs to fire to the correct temperature, to not fire at too fast a rate through major chemical changes, and to cool a kiln slow enough so as not to cause thermal shock and cracking. For additional information please refer to From Clay to Ceramic and Ceramic Firing, section of the Ceramic Handbook.
Basic firing ranges.
Remember always to check the info on the clay-bag for the correct temperature for your specific clay body.Low fire Earthenware, 950 –1100 °C, cones 015–1, cone 04 average
Mid-range Stoneware, 1162–1240 °C, cones 2–7, cone 6 average
High-fire High fire stoneware, porcelain, 1263–1326 °C, cones 10 –13
Temperature Stage of Firing
100 °C Water boils causing wet green-ware to explode (if temperature rises too suddenly)
220 °C During cooling if cristobalite crystals are present in clay they rapidly shrink (3%) potentially cracking ware.
350–500 °C Permanent dehydration of clay occurs. Clay is Chemically changed.
573 °C Quartz inversion happens causing quartz in clay and glazes to expand when heating and contract during cooling.
600–900 °C Organic and inorganic matter is burned off out of clay.
1100 °C Mullite crystals begin forming in porcelain clays.
(Zakin & Bartolovic, 2015)
Other Equipment and Tools
Clay preparation and production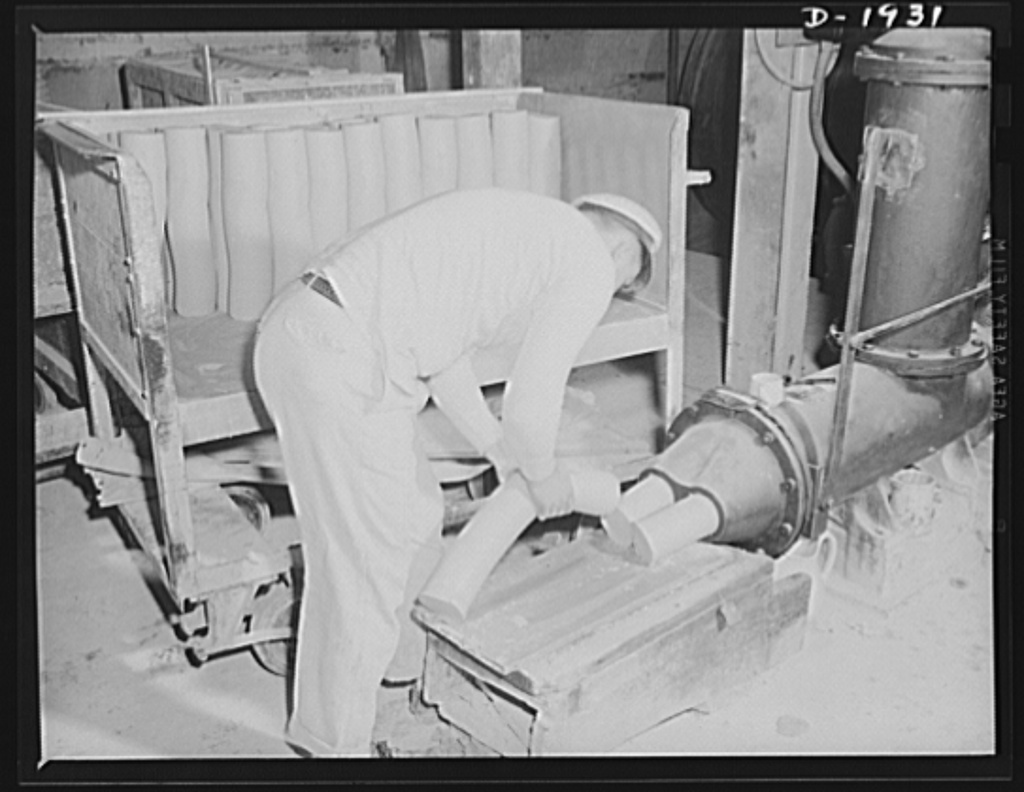
Figure 7. Pug mill.
Pug mill
A machine used for mixing and recycling clay. In one chamber with a rotating mixing head the material is added which is then compressed and extruded out of the end into processed clay logs. It is a very efficient machine for recycling and reusing clay waste of various stages of dryness or wetness.
Extruder
A tool that passes clay through a tube to form coils, often uses different shaped dies to create different profiles of the extrusion. It consists of a metal tube attached to the wall, in which the clay is put. The desired profile of extrusion should match the die in the bottom of the metal tube. A metal arm is attached to a metal circle which fits into the tube and using leverage, pushes the clay though the die. The resulting extrusion can be either solid or hollow and creates a very strong and compressed form.
Slab roller
Table with a horizontal cylinder with adjustable height attached to a large wheel, which when cranked, moves the cylinder across the table and clay evenly. The slab roller presses and squeezes clay between two sheets of canvas creating an equally flat piece of clay. Often, different pieces of canvas are used for different colors of clay. It is the more efficient and accurate version of a rolling pin and resembles the design of a basic printing press.
Pottery wheel
A pottery wheel is a spinning horizontal round piece of metal (or other material) attached to an axis that is controlled and spun by either electricity or manual power. Electric wheels can often spin clockwise or counter-clockwise and the speed is controlled by a pedal. Most wheels have a splash pan, which collects excess water and clay from the wheel-throwing. There are also kick-wheels, which have another larger rotating wheel attached to the main axis instead of a motor that is literally kicked by the thrower to gain momentum and spin. A treadle wheel is a design one step up from a kick wheel that uses a sort of swinging pedal which acts as a crank to maintain spinning speed of the wheel. Especially in Asia, traditional pottery wheels can be found that are spun instead with a stick and are often very low to the ground, allowing the potter to sit on the floor.
Slip-mixer
A slip-mixer is a tank that includes a drill used for mixing and dispensing casting slip. The level of complexity varies, some include: a hose with nozzle and pump to dispense slip and a timer for mixing and agitating. These more complex slip-mixers are most common in studios or factories with high production.
Jigger
A jigger is a wheel used for serial production of forms using plastic clay. A concave or a convex plaster mold is held in place and spun on the wheel with a piece of clay inside. Then a retractable arm is lowered with the corresponding interior or exterior shape cut into a profile tool. The profile both compresses, trims, and shapes the plastic clay. When the arm and profile tool are pressed down all the way, the desired form should be made. Jollying is the term used when the arm forms the concave interior shape, and jiggering when the convex exterior shape is formed. Using a jigger is still used as a means of producing circular functional ceramics in high volumes and has the advantage of using a wider variety of clay bodies versus slip-casting.
Glaze preparation and glazing equipment
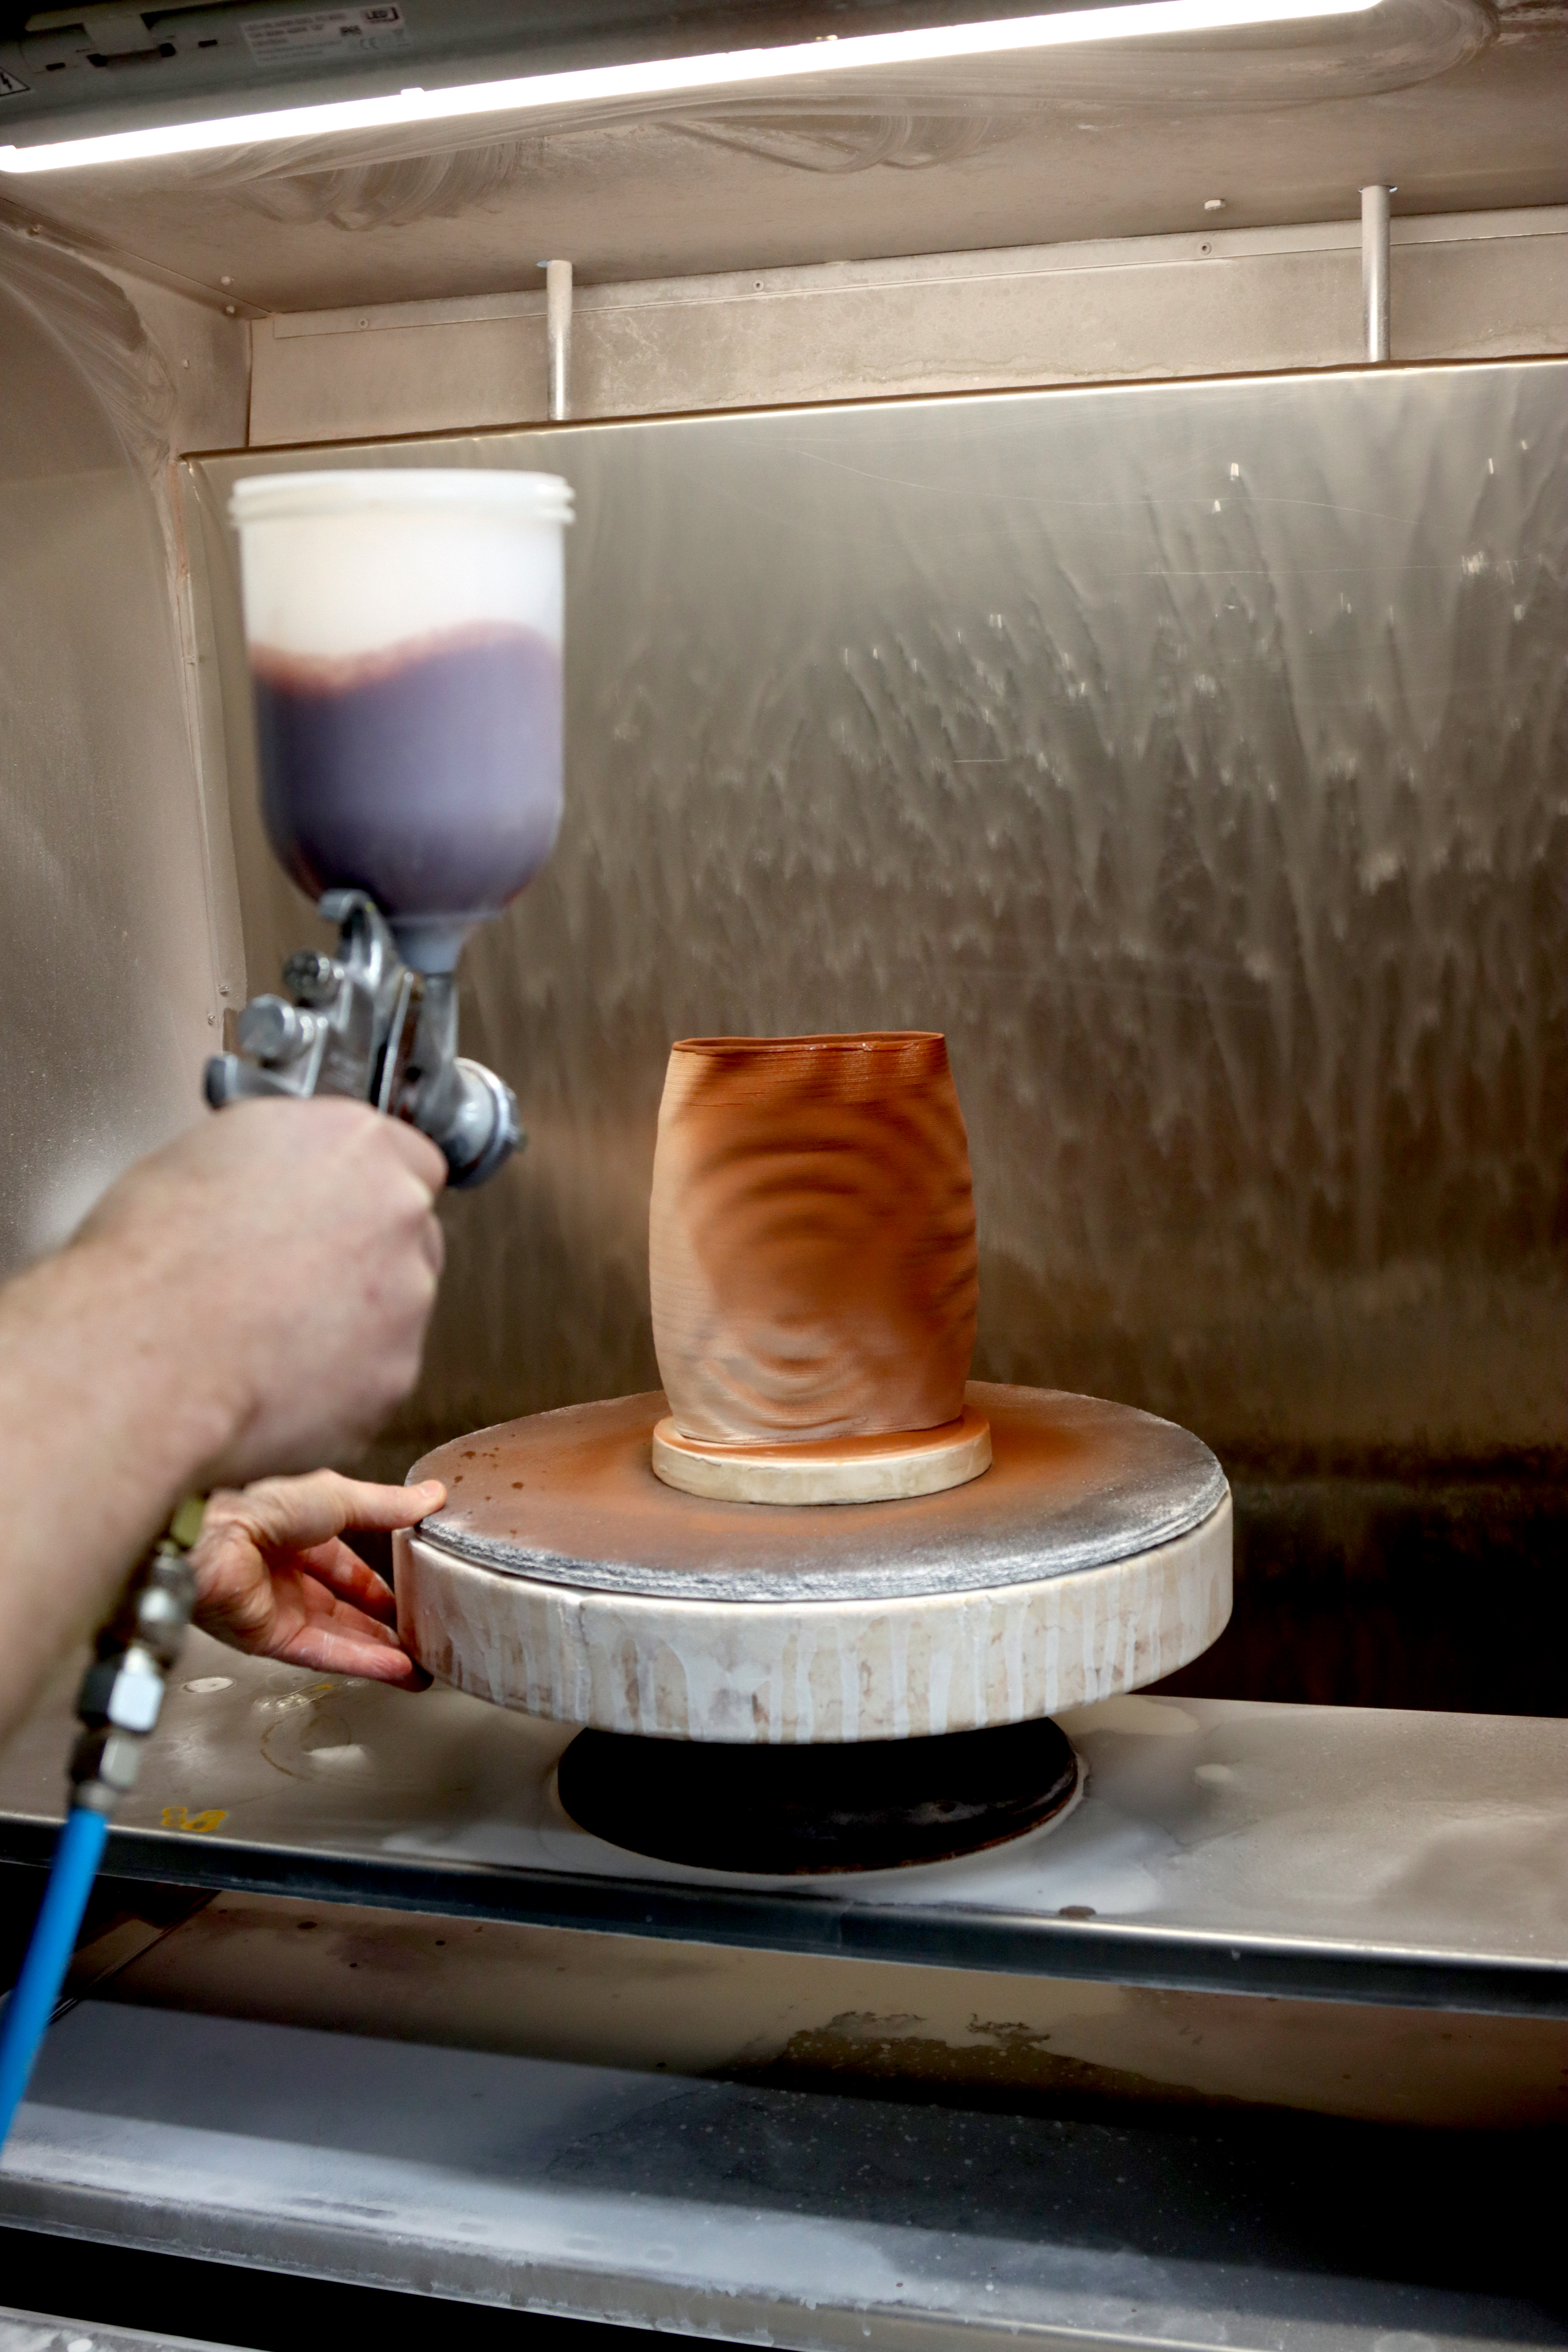
Figure 8. Spray booth.
Spray booth
A spray booth uses a spray-gun for glaze application. Glaze and compressed air are fed from the tank to the nozzle of the gun, after which a layer of glaze is sprayed on the surface of the object. It is important to spray in a glass cabinet to prevent glaze dust from spreading into the room air. There is also a manual low-tech version which uses a small metal container and the user’s own breath blowing through a tube to spray glaze on a small-scale production level.
Ball mill
Ball mills are used for grinding minerals, oxides, glazes, colors, or for making terra sigillata. The machine usually consists of water-tight ceramic jars with small ceramic balls inside, which when continuously rolled, mill or grind the material into smaller particles, leaving very fine materials in the end.
Plaster modeling
Plaster wheel
A plaster wheel resembles a pottery wheel but is usually higher, used standing or sitting, also depending on whether it is a purely electric or a kick-wheel. It is used for making plaster models or prototypes and circular molds. Plaster is cast vertically on a wheel head and left to set to semi-soft or fully set to be formed, carved, and worked. If the plaster is turned when it is still semi-soft, often a profile tool is used to sledge or smear the plaster into shape in the beginning and then refined as it hardens. The plaster can also be tooled free-form with sharp, long handled carving tools, usually aided by a horizontal bar between the user and the wheel for resting the tool or arm for added control. Different plaster traditions vary from different places, such as in the U.S., Europe, and Asia. The system holding the plaster piece on the wheel varies, such as casting a thickness of plaster on the wheel head and using a key system similar to mold keys to avoid having the model come loose spinning. Or some wheels have a separate metal piece that can be screwed in and changed based on the height of the model to act as a sturdy and stabilizing core.
Plaster lathe
A plaster lathe works just like a wood lathe, where a solid cylinder of plaster is clamped horizontally and spun to be carved and tooled. The plaster must be hard, but fine accuracy can be achieved and objects that are taller are often better executed on a plaster lathe than a plaster wheel.
Safety and sustainability
There are both obvious and unseen, immediate, and long-term aspects that are dangerous within the ceramics working area. These include situations involving kilns, clay and glazes, plaster, and studio equipment.
One must be aware of these risks before working in the studio in consideration with their own well-being and the safety of others. Above all, the health of an individual relies on the facilities remaining maintained, organized, clean, and used by considerate and informed users.
Health and Safety
Kilns
Kilns are large industrial ovens that get very hot. Before touching a kiln, you should look at the temperature to know whether it is appropriate or safe to open it or touch it. When a kiln is cooling it can be propped open at 300 °C and opened at 200 °C. The objects can be taken out of the kiln only after it is safe. One should always be especially mindful of the kiln user and consult their wishes for cooling before opening a kiln.
Heat and PPE (personal protection equipment)
The kilns are insulated with soft bricks, but as the kilns are fired between 800–1300 °C, the metal outside surface of the kiln still becomes very hot. Before a kiln is started, always make sure nothing is left on top or nearby that could catch fire, such as a wooden board used to carry work. When opening a hot kiln, unloading work and shelves, one should always use special heat refractory gloves. When glaze melts to the kiln shelf or a piece is broken, one should be very careful to also use gloves for cleaning, as the glaze and ceramic pieces become sharp like glass. When cleaning the kiln shelves, also protective eyewear and respirator is needed.
Kilns should always be cleaned after use. If there is an error or some equipment broken, it should be reported to the kiln master, addressed, and restored in a timely manner. All experimental firings, for instance containing organic material, need to be discussed with the ceramic studio master or carefully planned, as they can cause dangerous smoke, fumes, or harm to the equipment.
Hazardous kiln gases
Firing with salt creates hydrochloric acid, which is poisonous. It should not be used indoors, and if firing a salt kiln outside, the area should be vacated after inserting the salt into the kiln. In recent decades, soda (sodium bicarbonate or commonly known as baking soda) has been used as an alternative, producing its own unique effects.
All kiln firings create harmful fumes containing carbon monoxide, sulphur dioxide and fluorine compounds. Kilns should always be in a separate room from the studio and well ventilated.
(Health & Safety, n.d.)
Interview with Keracomp
The following is an interview with Kimmo Lattu of the company Keracomp about kiln guidelines, safety, and regulations. Keracomp was founded in 1974 in Porvoo, Finland first to manufacture kilns for schools and smaller ceramic companies and now has widened its scope to develop also different kinds of heating equipment and other kinds of ceramics equipment (Keracomp OY, 2020). Their products and relevant equipment information can be found on their website: https://keracomp.fi/
1. What are hazardous kiln situations to be avoided for personal safety?
Actual hazards can be created in two ways.
Firstly, open the hot kiln without suitable protection. For this reason, the instructions for kilns recommend a certain temperature limit, which must be met before opening the kiln (of course this also affects the durability of the kiln structures and objects).
Secondly, interference with electrical installations. As with all electrical equipment, changes can lead to a situation where the danger to life is imminent but also to a situation where the danger does not materialize until years later.
2. What are the ways to avoid equipment deterioration?
Careful work and immediate cleaning are key aspects. That is, the user needs to know what materials are put in the kiln, and how they behave at a certain temperature. This avoids breakdowns of objects, glaze spills, which always strain the kiln and kiln equipment as well.
If and when something breaks down in the oven, it is important to clean all the splinters and splashes out of the kiln, for example by vacuuming. If something has melted on the inside of the kiln, you should remove it even if it breaks the brick surface. For example, a glaze drip melts a little deeper into a brick in every firing. And a red clay chip between the elements will melt across the element in the next high firing.
Another issue is the control of water vapor released from objects. It is good to get water vapor directly out of the kiln, since as it passes through the structure it condenses on cooler metal surfaces and promotes their corrosion.
3. With electric kilns, how often are the elements changed and how do you know?
According to the need. Visually, the best means of assessment is a change in the shape of the element coil. The element in the groove starts to fall, the loops rest against each other and the element starts to hang and/or accumulate in a tight bundle. Following the process, a strong symptom of the need to replace resistors is a clear prolongation of glazing firing; as it ages, the power of the resistors decreases, increasing the duration of combustion. For industrial use, controllers are available that monitor the power of the resistor groups and warn the user when a certain limit value is exceeded.
4. Are there clear laws in Finland for where a kiln can be installed?
No. The matter is mainly regulated by three factors.
The kiln manufacturer/importer must state the environment in which the oven may be installed. This must be taken into account, for example safety distances for fire safety. This is included in the requirements for the CE marking of the appliances and can be found in the kiln's operating instructions and from the manufacturer/importer.
From a construction engineering point of view, the information provided by the kiln manufacturer is indicative and the construction industry has its own practices and regulations for resolving issues related to materials and building services.
The regulation of ventilation in buildings and workspaces again sets its own requirements, and these methods are typically chosen according to the use of the space in proportion to the number of people using the space. In public spaces, ceramic kilns are often required to be ventilated separately.
5. Are there specific regulations for ventilation for different kilns?
There are not. From the point of view of the ventilation of the room, the purity/impurity of the air released into the room and the heat load released from the furnace are essential. As I mentioned above, ceramic kilns often have their own discharge channel, but the dimensioning issue is always dependent on the whole.
6. How does kiln loading affect a firing?
Vitally. Even stacking is a prerequisite for even temperature distribution. The mass of the objects to be loaded into the oven should be distributed as evenly as possible inside the kiln. In practice, even if the kiln is not filled but the firing is forced to start, the kiln should be filled with extra kiln furniture so that the objects are evenly distributed around the kiln. The goal in this case is therefore not that the kiln is loaded as tightly as possible, but the stacking as evenly as possible, as the extra space only takes up energy unnecessarily.
7. Is it more sustainable to work in low-fire materials?
Yes. Low combustion temperatures have several advantages. The energy savings are obvious, but at least as important is the extension of the life span of the kiln structure and elements. This is of great importance when you consider that the production of kiln materials has already required quite a lot of energy. It can be compared to a car, for example, if the car is always driven as hard as it can be, emissions and maintenance costs are high and service life is short.
8. Is it more sustainable to use electricity or gas?
There are probably no big differences in energy consumption in studio use. More important for the environment is the source of energy produced. Electricity generated by wind power is certainly more sustainable than natural gas, and natural gas is more sustainable than electricity produced by coal power.
9. Is it possible to install a personal gas kiln in Helsinki?
I think it is. A property owner, fire inspector and building inspector will probably be needed. Here, too, the whole is decisive, that is, what and where.
Clay and glazes - dust, food-safety, and hazardous materials
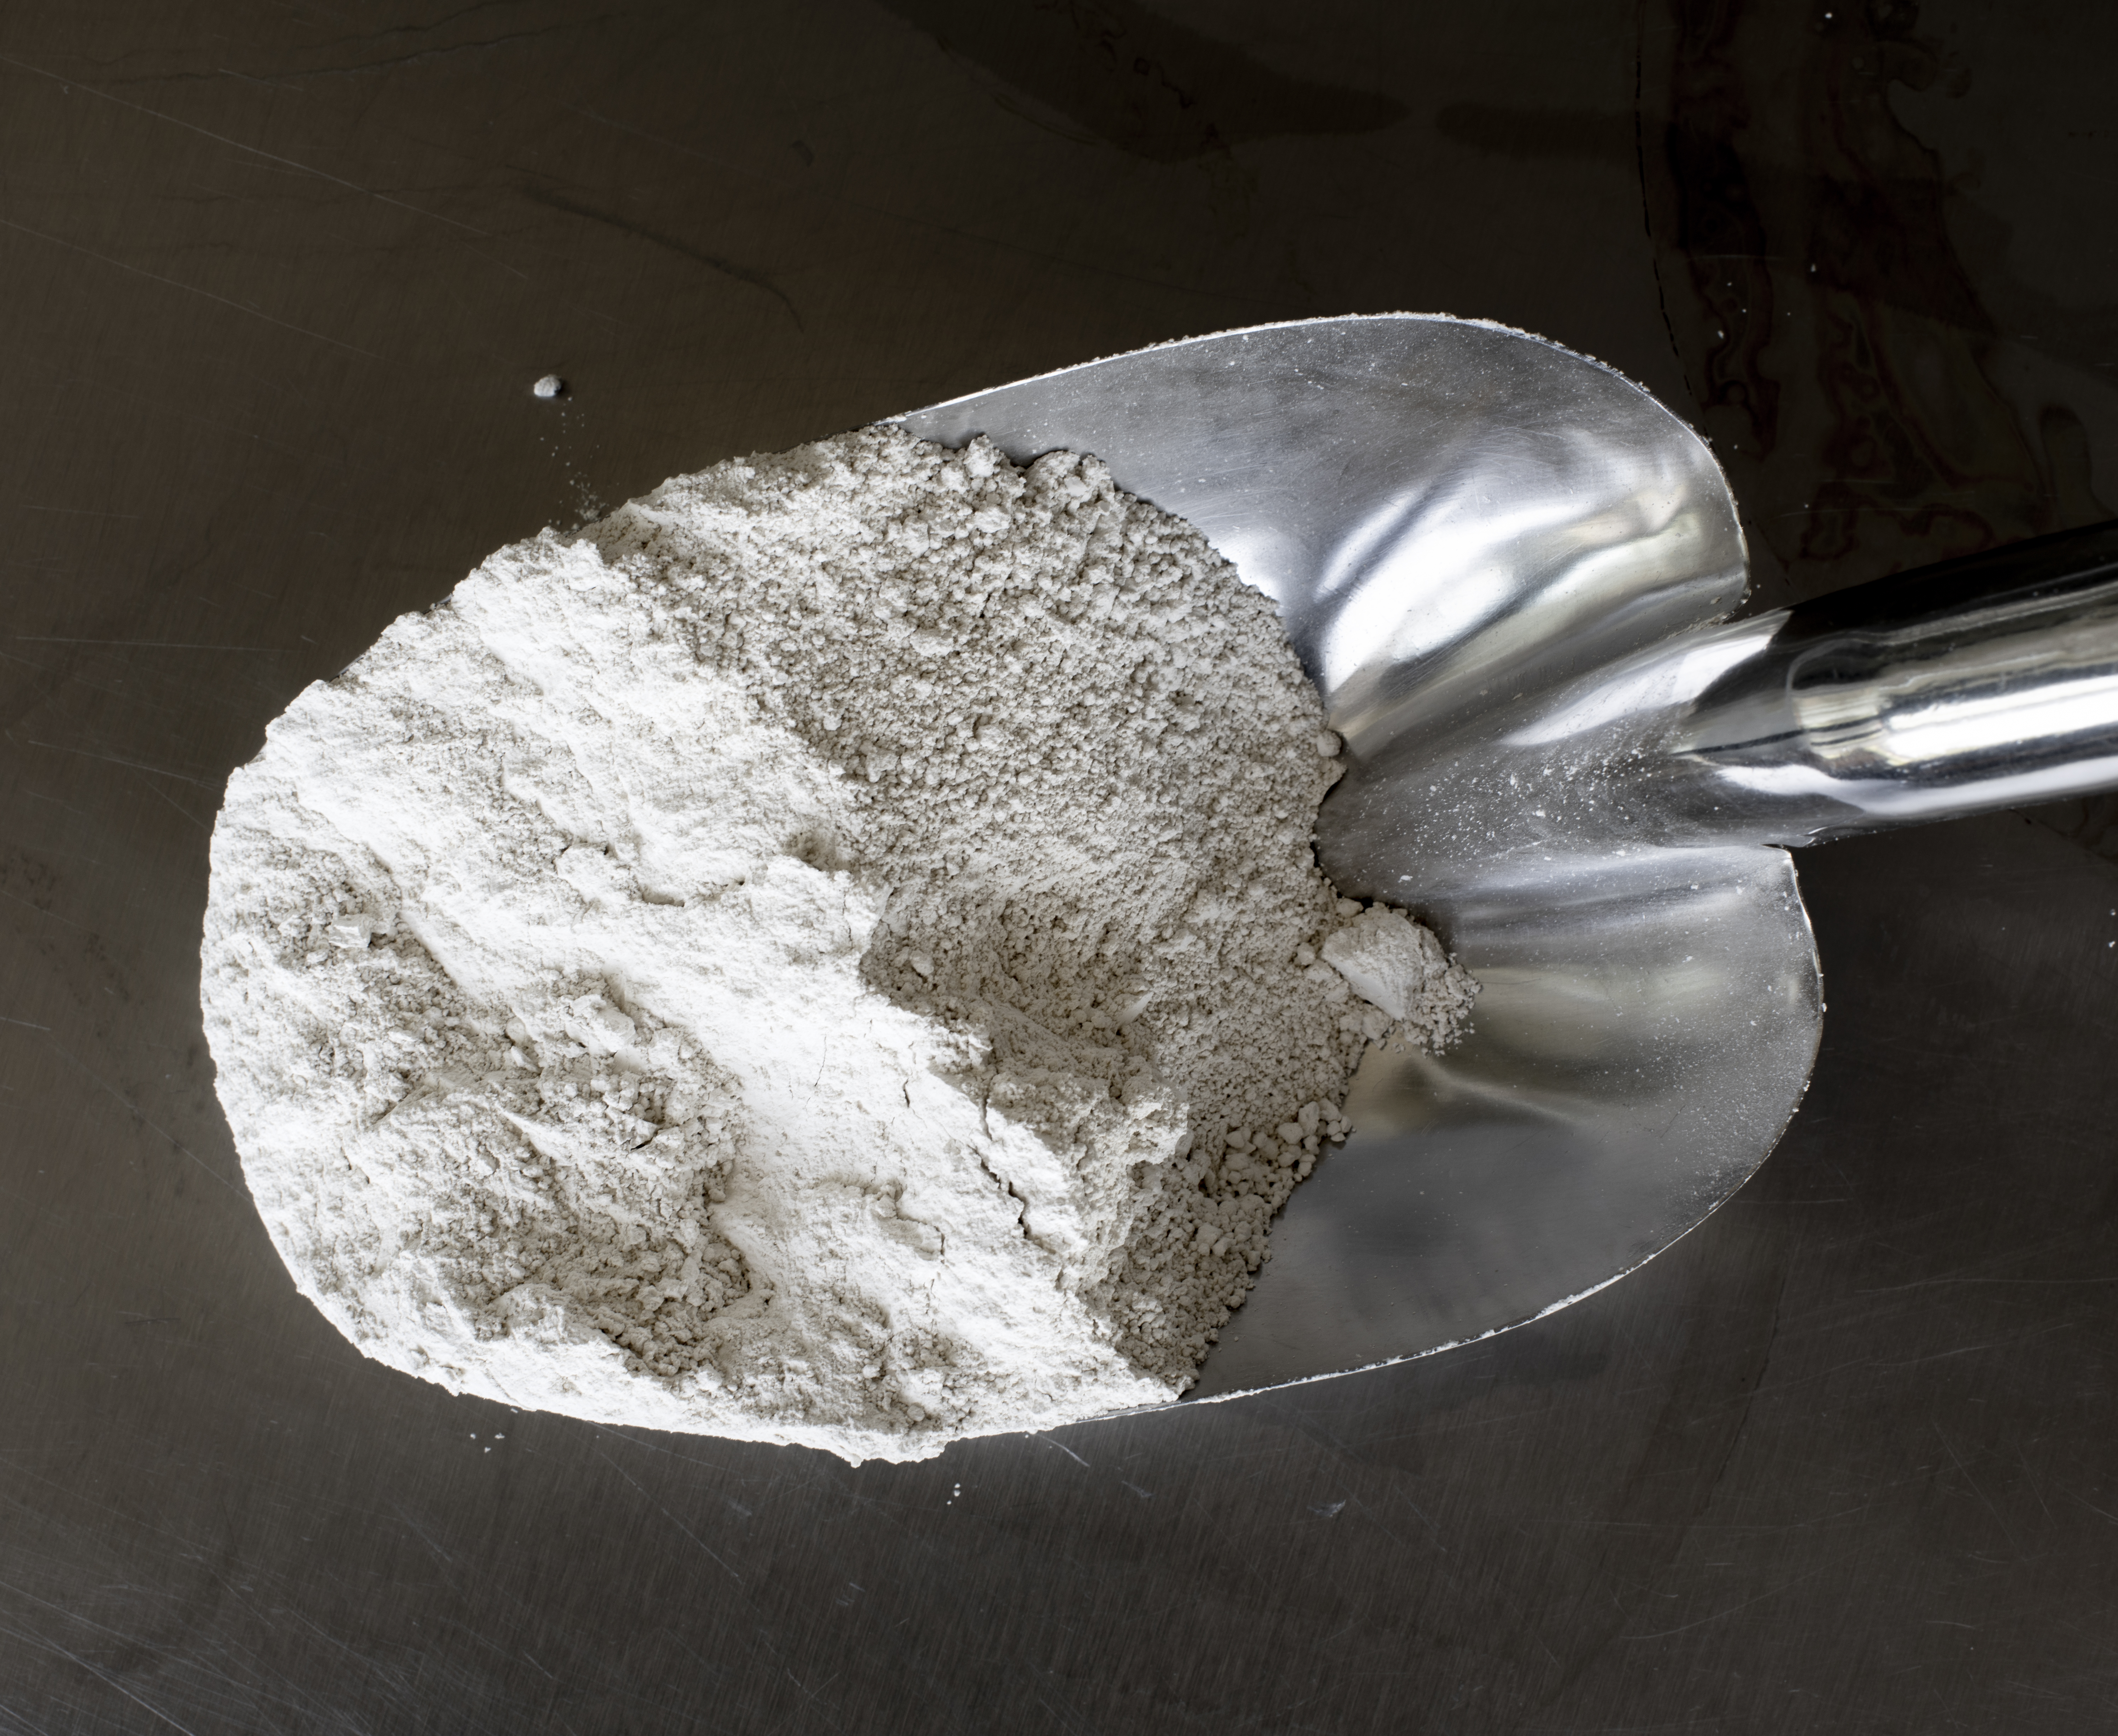
Figure 9. Shovel of raw material dust.
Avoiding dust and other healthy studio practices
Clay and glazes are made up essentially of silica-based raw materials and pose the largest health risk when airborne. The particles are very tiny, not visible to the human eye, and therefore are an unseen risk over a long time and repeated exposure to the lungs. The worst side effects of long-term silica dust inhalation are pulmonary fibrosis (silicosis) and lung cancer.
Good and healthy studio practice includes tidiness and cleanliness. Floors and surfaces should always be cleaned with a damp tool to suppress as much dust as possible. The largest most common overlooked hazards are dirty floors. As feet walk over dry clay and glaze debris, it is broken down, agitated, and becomes dust in the air repeatedly.
Ceramic materials should never be ingested. Wearing a mask or respirator for fine particulates is most important when mixing powdered raw materials, spraying glaze, or grinding kiln shelves, as in these cases the materials can be even visibly airborne as dust.Also, to avoid dust, bisque ware should never be sanded dry. The bisque ceramic piece should be fully wet, and saturated with water and sanded with wet-dry sandpaper.
Certain low-fire surface applications should be used with caution, a vapor mask, and good ventilation, including china paint and luster.
Food safety
If you make ceramic items for cooking or eating, check the food safety of the glaze with the manufacturer or seller. The food safety of a functional ceramic dish depends on the glaze surface, clay body and glaze maturity, and application. There are laboratories which will test the safety of a glaze surface (such as EVIRA), but most common glaze defects are harmful over long-term use and are visible quickly. The interior surface that is used with food or drink, should be glossy or semi-matte and unbroken. Matte glazes are often composed of tiny bubbles imperceivable to the naked eye. Cracked glazes should also not be used. These sort of breaks in the surface no longer contain glaze chemicals in a sealed glassy layer, but allow chemicals to leach out over time, especially with acidic liquids like coffee or orange juice.
If a cup is crazed, you will often see signs of liquid passing into the ceramic body from the inside through the exterior or foot and eventually staining. A simple at-home test can be done with a 10% citric acid solution for one week or using even a slice of lemon. If the acid is leaching through the glaze, there will be a change in the color quality of the glaze over even one day. This means the glaze is broken, materials from the glaze can leach into food and drink, food and drink can be trapped in the glaze layer creating mold over time, and the piece is therefore unsuitable for use with food.
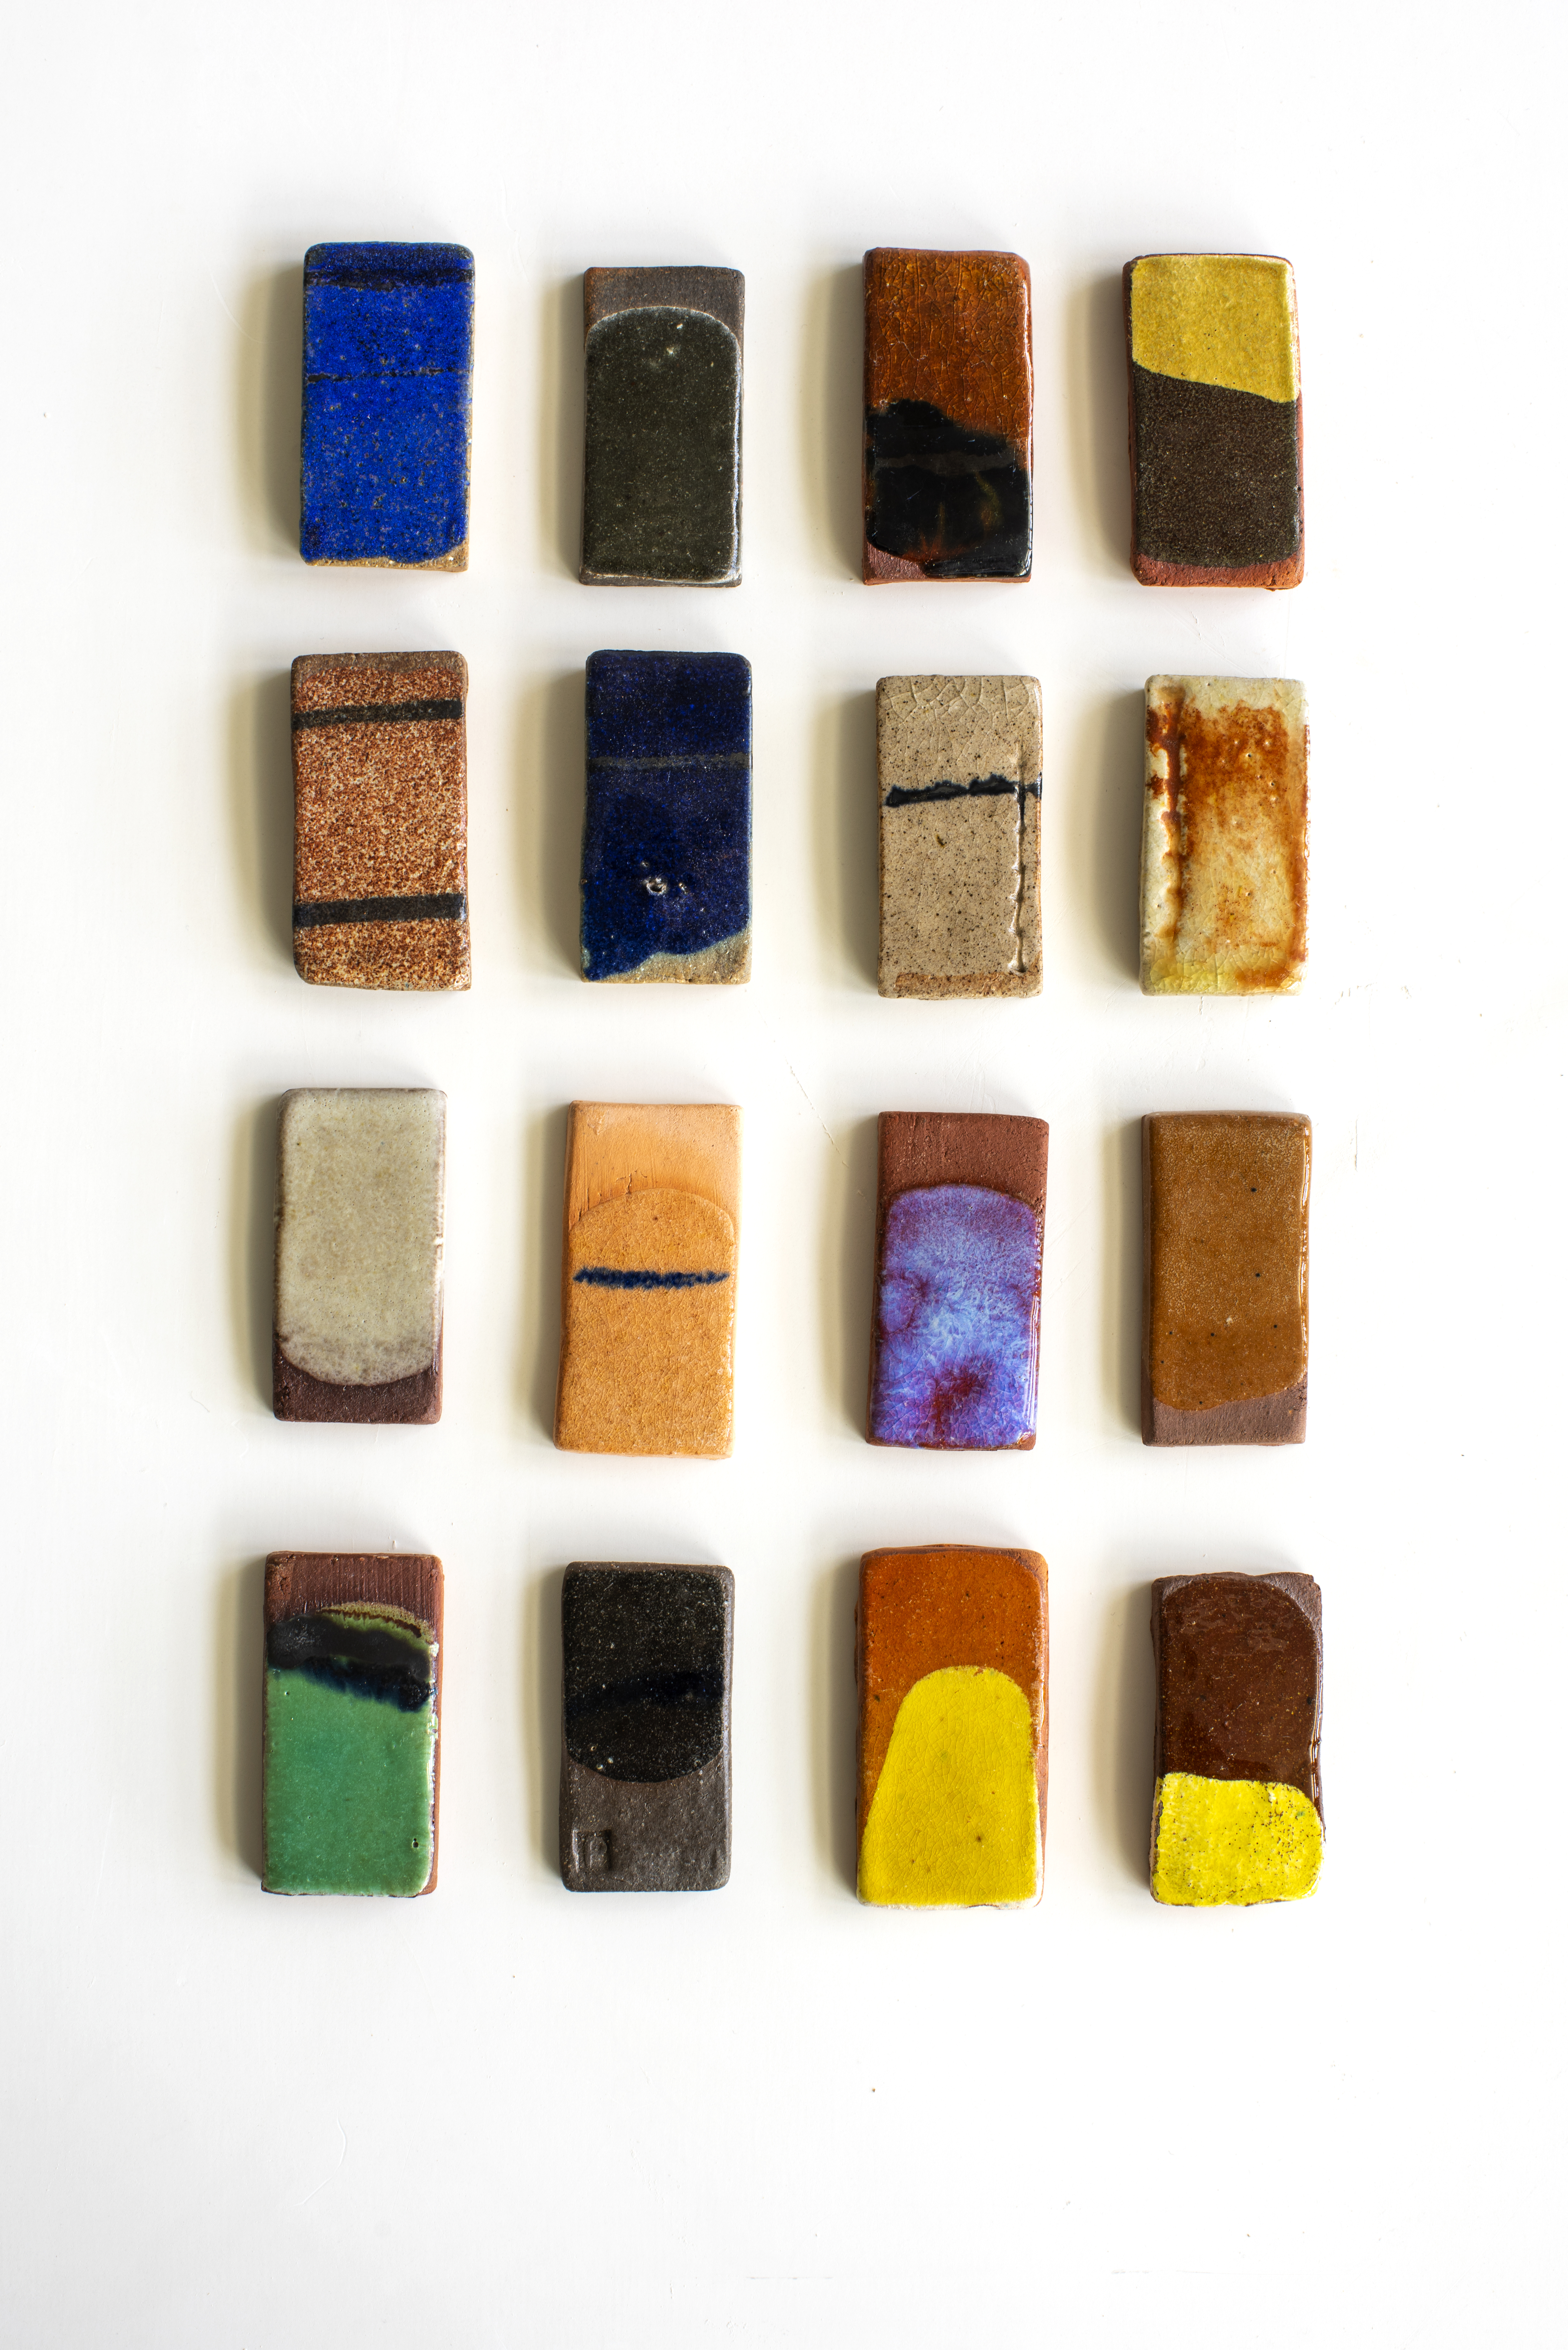
Figure 10. Different glaze surface qualities.
Most metal oxides are hazardous to ingestion. This means they should be processed with extra caution while mixing and disposing of them. Hazardous waste that goes into the sink can eventually enter groundwater and cause larger pollution. Such as at Aalto University, any glaze material that is hazardous, or completely unknown should be treated as hazardous, and put into the hazardous waste drum in the glazing area. This metal drum, when filled, is disposed of by a waste management company. Below in the Sustainability section, there are different methods explained to recycle personal hazardous waste that are more cost effective and ecologically minded. As discussed in the first Ceramic materials section under Metal Oxides, the most common hazardous material compounds to be used with caution are: cobalt, copper, chrome, nickel, barium, and manganese (firing fumes).
Materials and recipes using lead, uranium, and cadmium are no longer used due to their toxicity.
Please note! Any materials brought from outside into the university setting must be approved by the studio master.
M/SDS safety sheets
MSDS or SDS or material safety data sheets are important documents provided upon request by a material supplier or manufacturer for ceramic raw materials, clay, glaze, etc., to provide information on risk, contents, and safety. The exact requirements vary from each country, but the information below is most common for ceramic materials.
MSDS include following information of a product or a raw-material:
- identification and use
- hazardous ingredients
- reactivity data
- toxicology properties
- preventative measures
- first aid measures
- date and who has prepared the MSDS
(Spectrum Glazes, n.d.)
For samples, one can visit https://www.spectrumglazes.com/msds.html to view hundreds of MSDS for Spectrum products. This is an essential document for transparency of materials that are otherwise completely mysterious. The Finnish Safety and Chemicals Agency discusses these safety data sheets as well on their website https://tukes.fi/en/chemicals/reach/safety-data-sheet.
Plaster
Plaster should be treated the same as any other dry ceramic material, as prolonged inhalation can cause asthma (see section above). When measuring dry plaster, a mask should always be used in addition to ventilation. All plaster pieces should be cleaned from the working area and placed into the trash. Plaster on the ground will be stepped on and suspended in the air as dust when broken down. Plaster should never go down the sink, as it clogs the drains over time. Surplus plaster is always emptied in
If making a plaster mold of a body part, it requires extra caution, and a professional should be consulted. Liquid plaster should not be used immediately against the skin, as the plaster becomes hot during the chemical reaction of its setting and hardening and can burn the skin. Also, a body part, such as a hand, can become stuck in a solid, stone-like piece of plaster which can only be broken open by force. Plaster should never go down the sink, as it clogs the drains over time. Excess plaster is emptied from the bucket into a dedicated container, never rinsed out down the drain.
Studio Equipment
Any machine that spins should be used with hair tied back and without clothes with strings or other parts that can be caught. Machines, such as mixers and blenders, should always be turned off or unplugged when cleaning or not in use.
Some studio equipment is heavy and in multiple pieces, such as banding wheels and plaster molds. Always band/strap molds together before moving and hold banding wheels by the base, as the bottom can fall out of the top. This will avoid dropping heavy things on your toes.
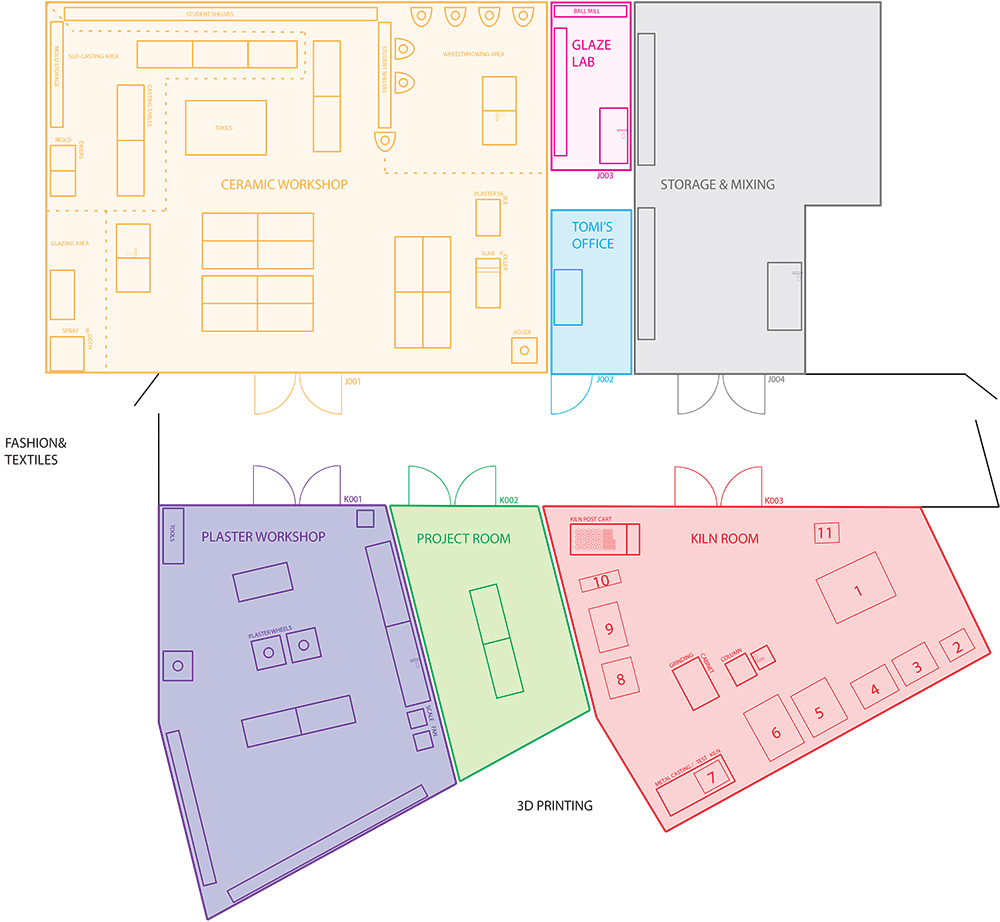
Figure 11. Aalto University ceramic workshop layout. The equipment has been organized in the space to create different areas for different tasks, such as plaster work, firing, clay work, glazing and slip-casting.
Sustainability
Individual potters have traditionally kept frugal and sustainable practices concerning material waste, water use, and fuel use. For sustainable purposes, it is functional practice to use low and mid temperature clay as opposed to using the most refined high-fire clay, e.g. porcelain. This reduces the energy needed for firing and opens up more local alternatives for materials, since there is no major source of the fine materials used for porcelain locally.
It is common practice that rinsing and collection systems are used in various technological forms in ceramic studios, since the clay will clog drains, water costs money, and the collected material can be used again. One of the great things about clay is that it can be reused infinitely before it is fired and undergoes chemical change.
Recycling Clay
Ceramicists are in the habit of recycling all their clay scraps to be rehydrated into newly workable clay.
Basic way to recycle plastic clay:
1. Break clay into small pieces in a bucket
2. Let it become bone dry
3. Fill the bucket with water to cover clay pieces
4. Wait for the clay to become saturated, broken down, and soft
5. Pour off any extra water
6. Hand mix or blend with a drill and mixing head
7. Spread clay slurry onto plaster slabs for drying
8. Flip the clay when the bottom has dried a bit and become plastic
9. Wedge clay once it is no longer wet or slippery
10. If clay is still too wet, it can be made into small arches, left to dry, and wedged again
For very large batches of recycling, a pug mill is suggested, which can mix, recycle, and de-air clay of different wetness at the same time.
A similar process can be used for casting-slip. Small bone-dry pieces can be added to dry raw materials when mixing fresh casting slip. A rule of thumb is to not use more than ½ of recycled casting slip material in a batch, as too much recycled casting slip can cause more interior casting surface defects. For instance: 25kg new raw materials + 25 kg recycled casting slip + 20-25 liters water + 80 g Dispex.
Recycling Glaze
Glaze waste, containing the most hazardous minerals for ground water, is often mixed into a new random glaze, or into the clay of a different product. This way, the color from this waste can be used and contained in an artifact rather than becoming contaminated waste. Often in the studios, there is too much waste to process and it is collected over time in a container for hazardous waste. Below are some alternate examples of projects and research into processing hazardous ceramic waste and moving towards a more sustainable ceramics culture.
References
Bloomfield, L. (2017). Science for Potters [Excerpt]. American Ceramic Society. https://ceramicartsnetwork.org/daily/firing-techniques/electric-kiln-firing/firing-clay-lowdown-ceramic-firing-process/
Finnish Safety and Chemicals Agency, Tukes. (n.d.). Safety Data Sheet. Retrieved 3.12.2020 from https://tukes.fi/en/chemicals/reach/safety-data-sheet
Frenzel, H. (2020, October 26). How to fire a gas kiln efficiently: perfect combustion in a gas kiln. Ceramic Arts Network Daily. Retrieved 30.11.2020 from https://ceramicartsnetwork.org/daily/clay-tools/ceramic-kilns/fire-gas-kiln-efficiently/
Galloway, J. (n.d.). Chemicals: Use and Disposal. Retrieved 30.11.2020 from
Gebhart, T. (2020, November 27). All about pyrometric cones. Ceramic Arts Network Daily. Retrieved November 30, 2020, from https://ceramicartsnetwork.org/daily/ceramic-supplies/ceramic-raw-materials/all-about-pyrometric-cones/
Hansen, T. (n.d.) Dunting. Retrieved 30.11.2020 from https://digitalfire.com/glossary/dunting
Hansen, T. (n.d.) Raku. Retrieved 30.11.2020 from https://digitalfire.com/glossary/75
Hansen, T. (n.d.) Reduction Firing. Retrieved 30.11.2020 from https://digitalfire.com/glossary/reduction+firing
Health & Safety. (n.d.) Botz Glasuren. Retrieved 3.12.2020 from https://www.botz-glasuren.de/en/gesundheit-sicherheit-sdb
Keracomp OY. (2020). Keracomp OY. Retrieved 18.12.2020 from https://keracomp.fi/keracomp-oy/
KeraSil Oy. (n.d.) KeraSil. Retrieved 18.12.2020 from https://www.kerasil.fi/
Levin, S. (2017). Wadding for Wood Firing. Retrieved 12.12.2020 from https://ceramicartsnetwork.org/daily/firing-techniques/wood-kiln-firing/wadding-for-wood-firing/
Spectrum Glazes. (2020). Material Data Safety Sheets. Retrieved 3.12.2020 from https://www.spectrumglazes.com/msds.html
Murphy, E. (2006). What is Soda Firing? http://potteryblog.com/tag/hydrochloric-acid/.
Types of firing: oxidation, reduction, salt, wood, raku. (n.d.) Retrieved 30.11.2020 from https://bigceramicstore.com/pages/info-ceramics-types-of-firing#:~:text=Reduction%20firing%20is%20typically%20done,the%20glazes%20during%20glaze%20maturation.&text=The%20atmosphere%20allows%20pieces%20to%20get%20a%20glazed%20like%20finish%20without%20glazes
Pelkonen, T. and McPartlan, M. (2020) Ceramics Workshop. [Unpublished teaching material] Aalto University.
Schimik, K. (2018). Sustainability in the Ceramics Studio. Retrieved 30.11.2020 from
Turvallisuus- ja kemikaalivirasto, Tukes. (e.p.). Käyttöturvallisuustiedote. Haettu 3.12.2020 https://tukes.fi/kemikaalit/reach/kayttoturvallisuustiedote#237668c2.
Zakin, R. and Bartolovic, F. (2015). Electric Kiln Ceramics [Excerpt]. American Ceramic Society.
Zakin, R. and Bartolovic, F. (2015). Electric Kiln Ceramics [Excerpt]. American Ceramic Society. https://ceramicartsnetwork.org/daily/firing-techniques/electric-kiln-firing/quartz-inversion-and-other-important-stages-of-firing-pottery/
Images and illustrations
Figure 1. Wikimedia Commons. (2005). Anagama Kiln. [Diagram]. https://commons.wikimedia.org/wiki/File:Anagama_kiln.svg .
Figure 2. Halko, S. (2014). Woodfired teapot. [Photo].
Figure 3. Franke, D.I. (2014). Raku. [Photo]. https://commons.wikimedia.org/wiki/File:Raku_15.06.2014_14-28-12.jpg.
Figure 4. McPartlan, M. (2020). Kiln Control Pad. [Diagram]. [Unpublished teaching material] Aalto
University.
Figure 5. Kerimov, N. (2020). Kiln Loading. [Illustration].
Figure 6. Haynes, C. (2007). Filled Kiln. [Photo]. https://commons.wikimedia.org/wiki/File:Filled-kiln.jpg.
Figure 7. Palmer, A.T. (1941). This is the exit end of a pug mill which prepares the plastic clays used in forming various articles of chinaware. [Photo]. United States Library of Congress. https://picryl.com/media/this-is-the-exit-end-of-a-pug-mill-which-prepares-the-plastic-clays-used-in.
Figure 8. Latva-Somppi, A. Spraying glaze. (2020). [Photo].
Figure 9. Kinnunen, A. (2020). Ceramic raw materials. [Photo].
Figure 10. Kinnunen, A. (2020). Glaze examples. [Photo].
Figure 11. McPartlan, M. (2020). Ceramic studio. [Illustration]