
Ceramic Handbook
Section outline
-

When designing ceramic objects, it is necessary to consider what technique should be used to realize the object and shape in question. Various best-known techniques include e.g. hand-building, such as coiling and slab building, and techniques suitable for small-scale production, such as throwing, casting and molding, and 3D printing. Techniques can also be combined with each other, and many makers develop techniques of their own that differ from the above-mentioned, most commonly used techniques. Researching techniques can also be a starting point for doing so, and experiments can lead to new, surprising results.
Once the technique used in the making has been selected, the clay body best suited to it is considered. For example, it is good to have a chamotte or grog in hand-built clay, which stiffens and reduces the drying shrinkage of the object. The wheel throwing clay must be plastic and sturdy, but it must be kept in mind that too rough a chamotte can break the skin of the hands when throwing.
At the design stage, it must be remembered to anticipate firing shrinkage, as clay shrinks during firing depending on the clay quality; the firing shrinkage of porcelain is about 14–16% and that of stoneware about 13%.
Drying is an integral part of the making process. There is a risk of cracking if the work dries too quickly or unevenly. Therefore, it is a good idea to cover the work with plastic, newspaper or cloth in the early stages of drying, because when lightly covered, they dry more evenly. The thicker the object, the longer it takes to dry. Depending on the humidity, a large hand-built sculpture may need to be dried for up to several weeks. After bisque firing, the objects can be glazed, after which they are glaze fired according to the quality of clay used. After glazing, the objects can still be decorated with, for example, decals or painted with china paints. The decals and china paint colors must finally be fired onto the object, the temperature of the decorative firing depends on the decoration used.
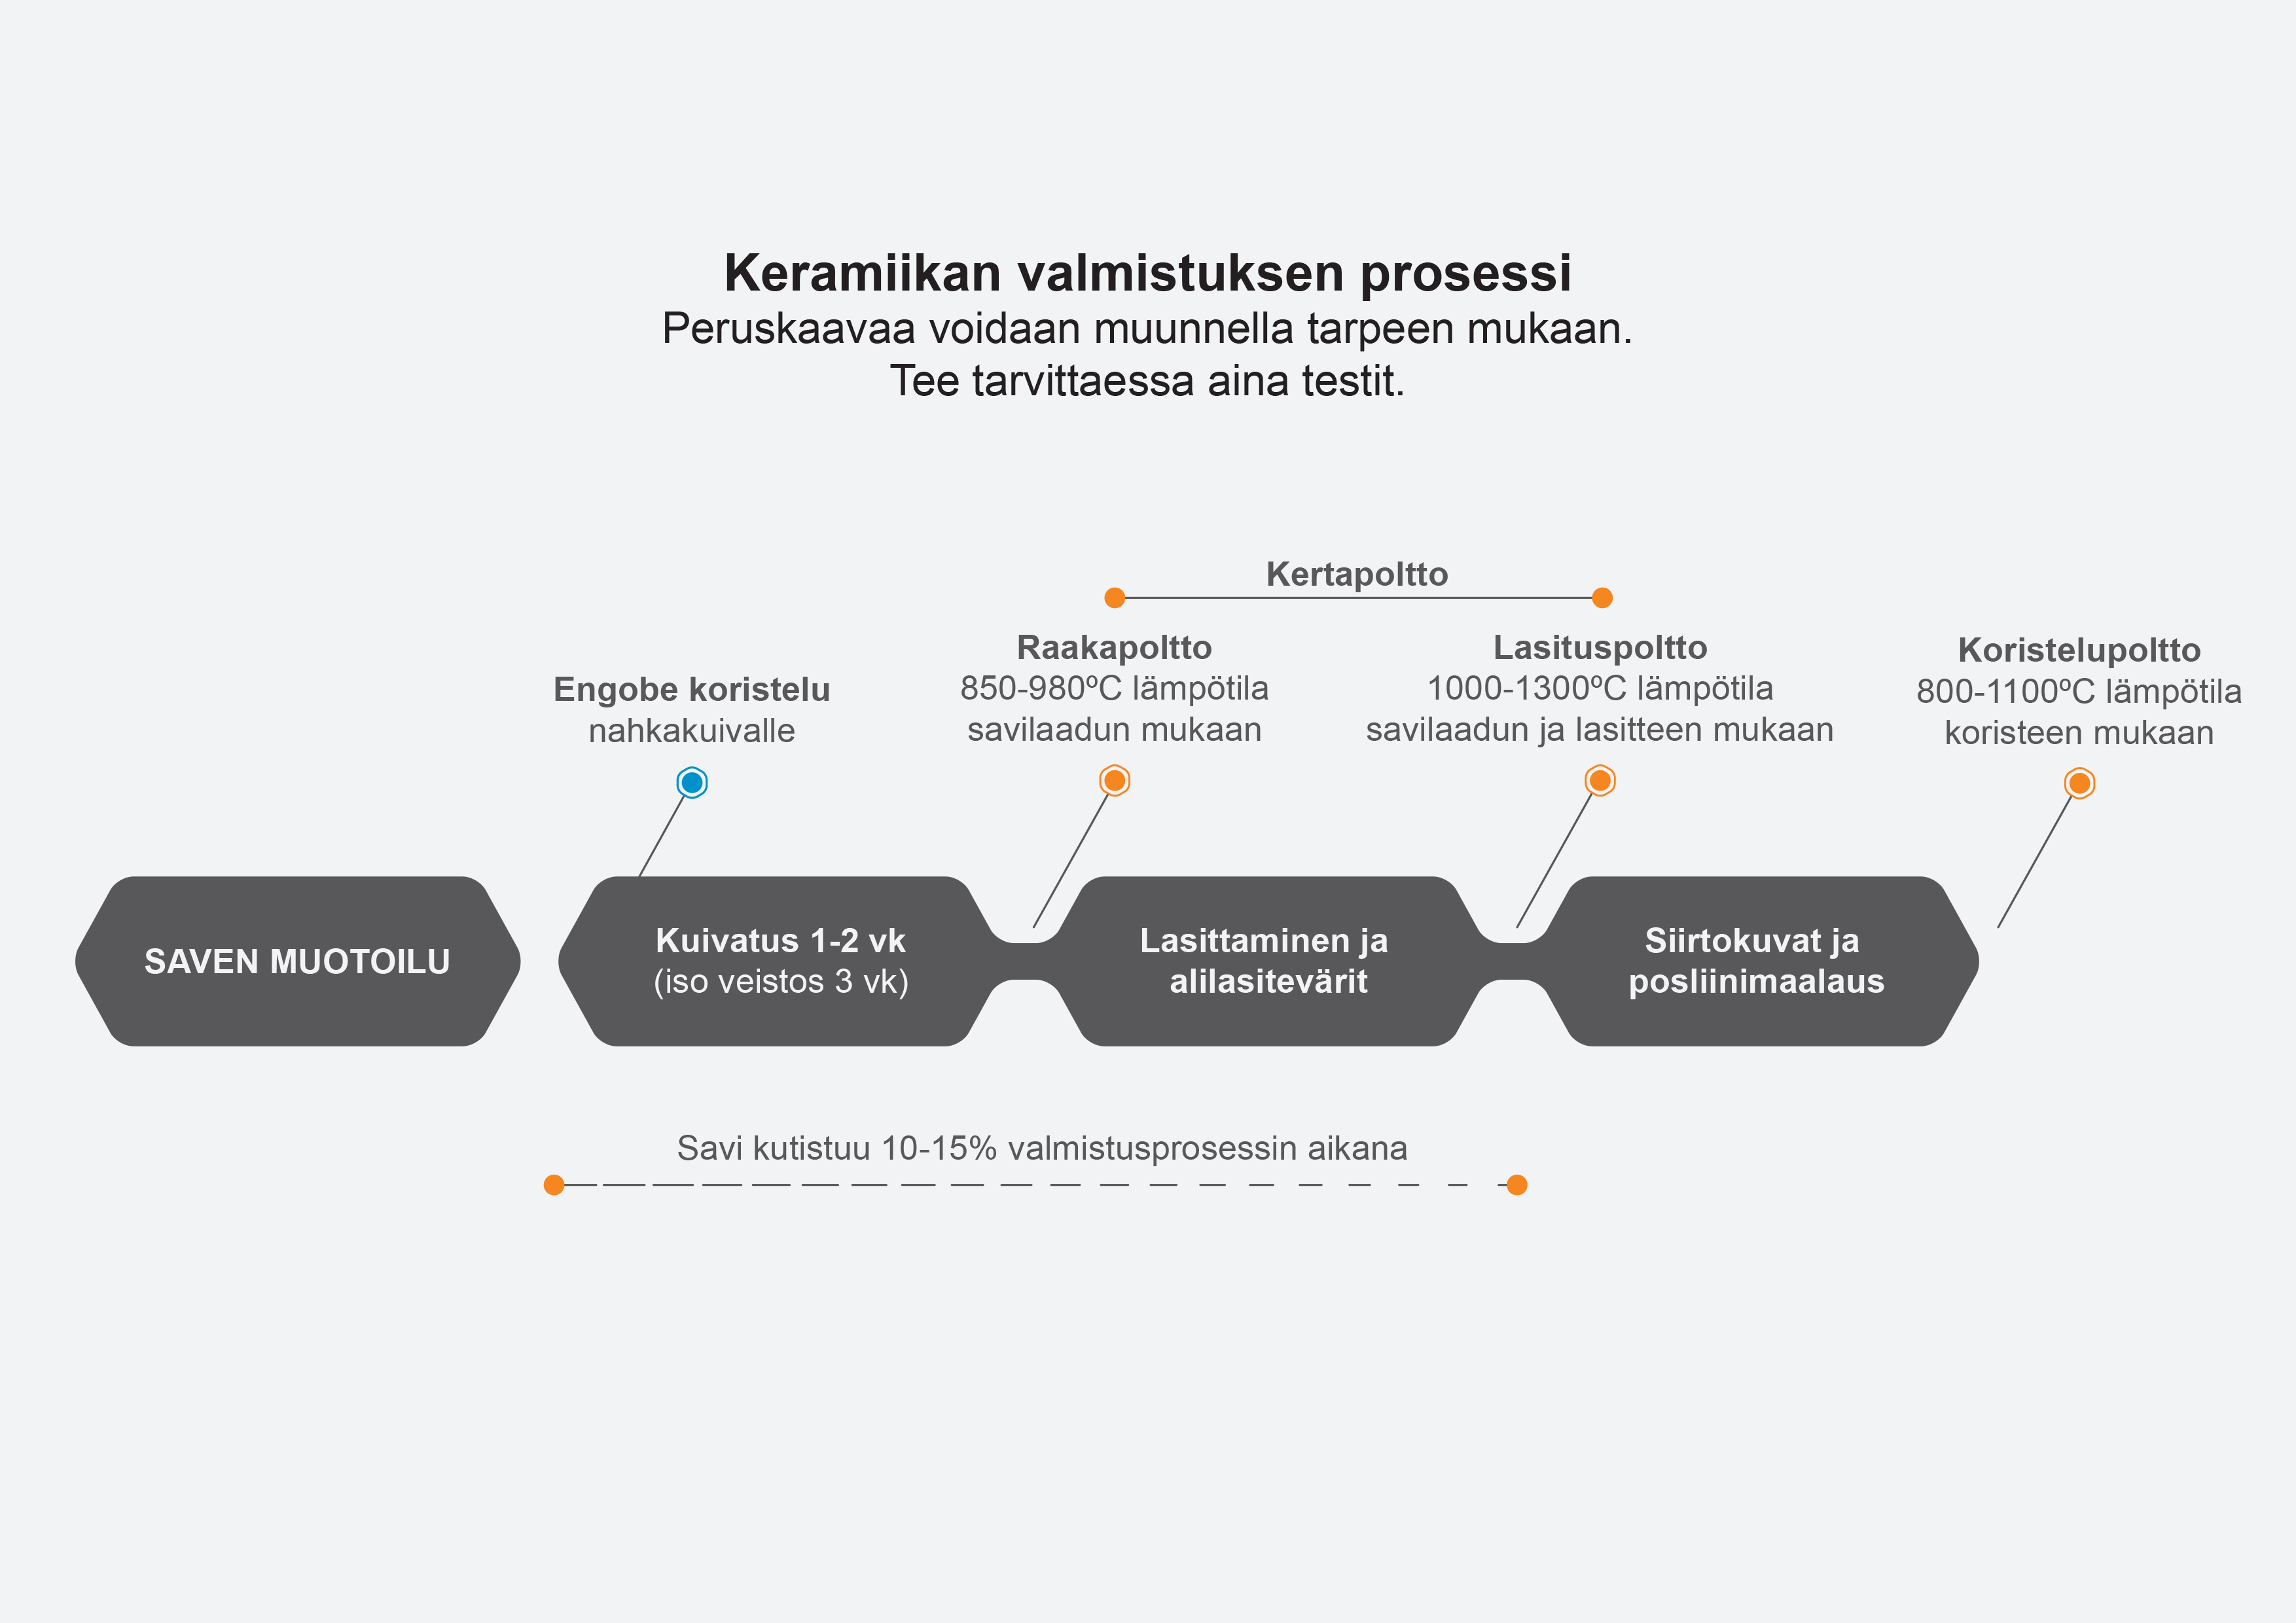
Figure 1. Ceramic making process
The above techniques and, based on them, advanced, personal working methods are discussed in video interviews and demonstrations of artists and researchers working in the field. In addition to various techniques, the videos reveal the working philosophy of the authors more broadly.
Hand-building
Hand-building is a method of making ceramics in which objects are made using fingers, hands, and simple tools. The most common hand-building techniques are the coiling technique and slab technique. Clay can also be machined without tools, for example with a pinching technique, in which an object is shaped from a clay ball by pinching with the thumb and forefinger. Different hand-building techniques can also be mixed together and combined in the same work.
In hand-building, it is good to use plastic and sturdy clay, which contains 0.5–2.0 mm chamotte 25–50%. The chamotte also facilitates large jobs, especially during construction, by solidifying and reducing the drying shrinkage of the object. Paper clay is also well suited for hand building, as the fibers brought in by paper make the clay durable in the unfired stage and can be used to build very thin and bulky walls.

Figure 2. Clay wedging
Before hand-building and throwing, the clay must be carefully wedged. Wedging improves the workability of the clay and, for example, long-standing clay becomes softer when wedging. Wedging also removes any air bubbles from the clay, which complicates the work, easily splits the object during the drying phase and forms bubbles on the surface of the object during firing.
Coiling technique
The coiling technique is a very versatile hand-building method that is particularly well suited for large-scale sculptures and asymmetrical shapes. Elongated coils are formed from plastic clay by rolling the clay with light movements against the table with the help of palms. The clay coils are placed on top of each other as a wall and joined together. The surfaces to be joined must first be roughened, for example by scraping with a fork, after which a clay slurry or slip made of the same clay, which acts as an adhesive, can be applied to their surface.
Video: Kristina Riska
(Only in Finnish at the moment, we are working with English translations. Please, be patient.)Slab-building technique
Like coiling technique, slab technique is a versatile hand-building method that is suitable, for example, for making tiles and sculptures. The slabs can be made by using a rolling pin or a clay slab-roller. They are cut to the desired size and shape and joined together, like with the coiling technique. With slab technique, it is possible to create large and uniform surfaces relatively quickly.
Video: Johanna Rytkölä
(Only in Finnish at the moment, we are working with English translations. Please, be patient.)
Video: Kirsi Kivivirta
(Only in Finnish at the moment, we are working with English translations. Please, be patient.)Small series
Small-scale production is serial production, but its production volumes are considerably smaller compared to industrial serial production. The advantage of small-scale production is freer formulation and a more versatile applicability of different clay bodies as well as glazes and surface techniques, as production is often handcrafted. In small series production, especially arts and crafts, the product designer often also acts as the manufacturer. The most typical techniques used in small series production are wheel throwing, press-molding, jiggering and casting.Wheel Throwing
Wheel throwing is a manufacturing method in which clay is shaped with a wheel. Turning creates regular, round shapes. The first wheels rotated at a kicking speed, but today most wheels are electrically operated, with the speed of rotation controlled by a pedal. Once the thrown object has dried to leather-hard, it can be placed back on the wheel and trimmed and finished by turning.
Good throwing clay is plastic and sturdy, which can withstand the stresses of spinning. Many natural clays, such as Finnish red clay, are well suited for throwing due to their high plasticity. Chamotte is also suitable for throwing clay, but too coarse chamotte wears and at worst breaks the skin of the hands. Throwing clay must be wedged well before use, as inconsistencies in the clay make it difficult to work the clay on the wheel.
Steps for throwing:
-Centering
-Interior and base forming
-Wall pulling (lifting)
-Forming an object
-Finish
Video: Camilla Groth
(Only in Finnish at the moment, we are working with English translations. Please, be patient.)Pressing
Pressing combines different techniques; slab technique and molding technique. Press molds are usually made from plaster. The plastic clay is rolled into a slab, cut to the desired size and placed inside or on top of the mold. The clay is pressed along the mold and the clay left over the mold is cut off.
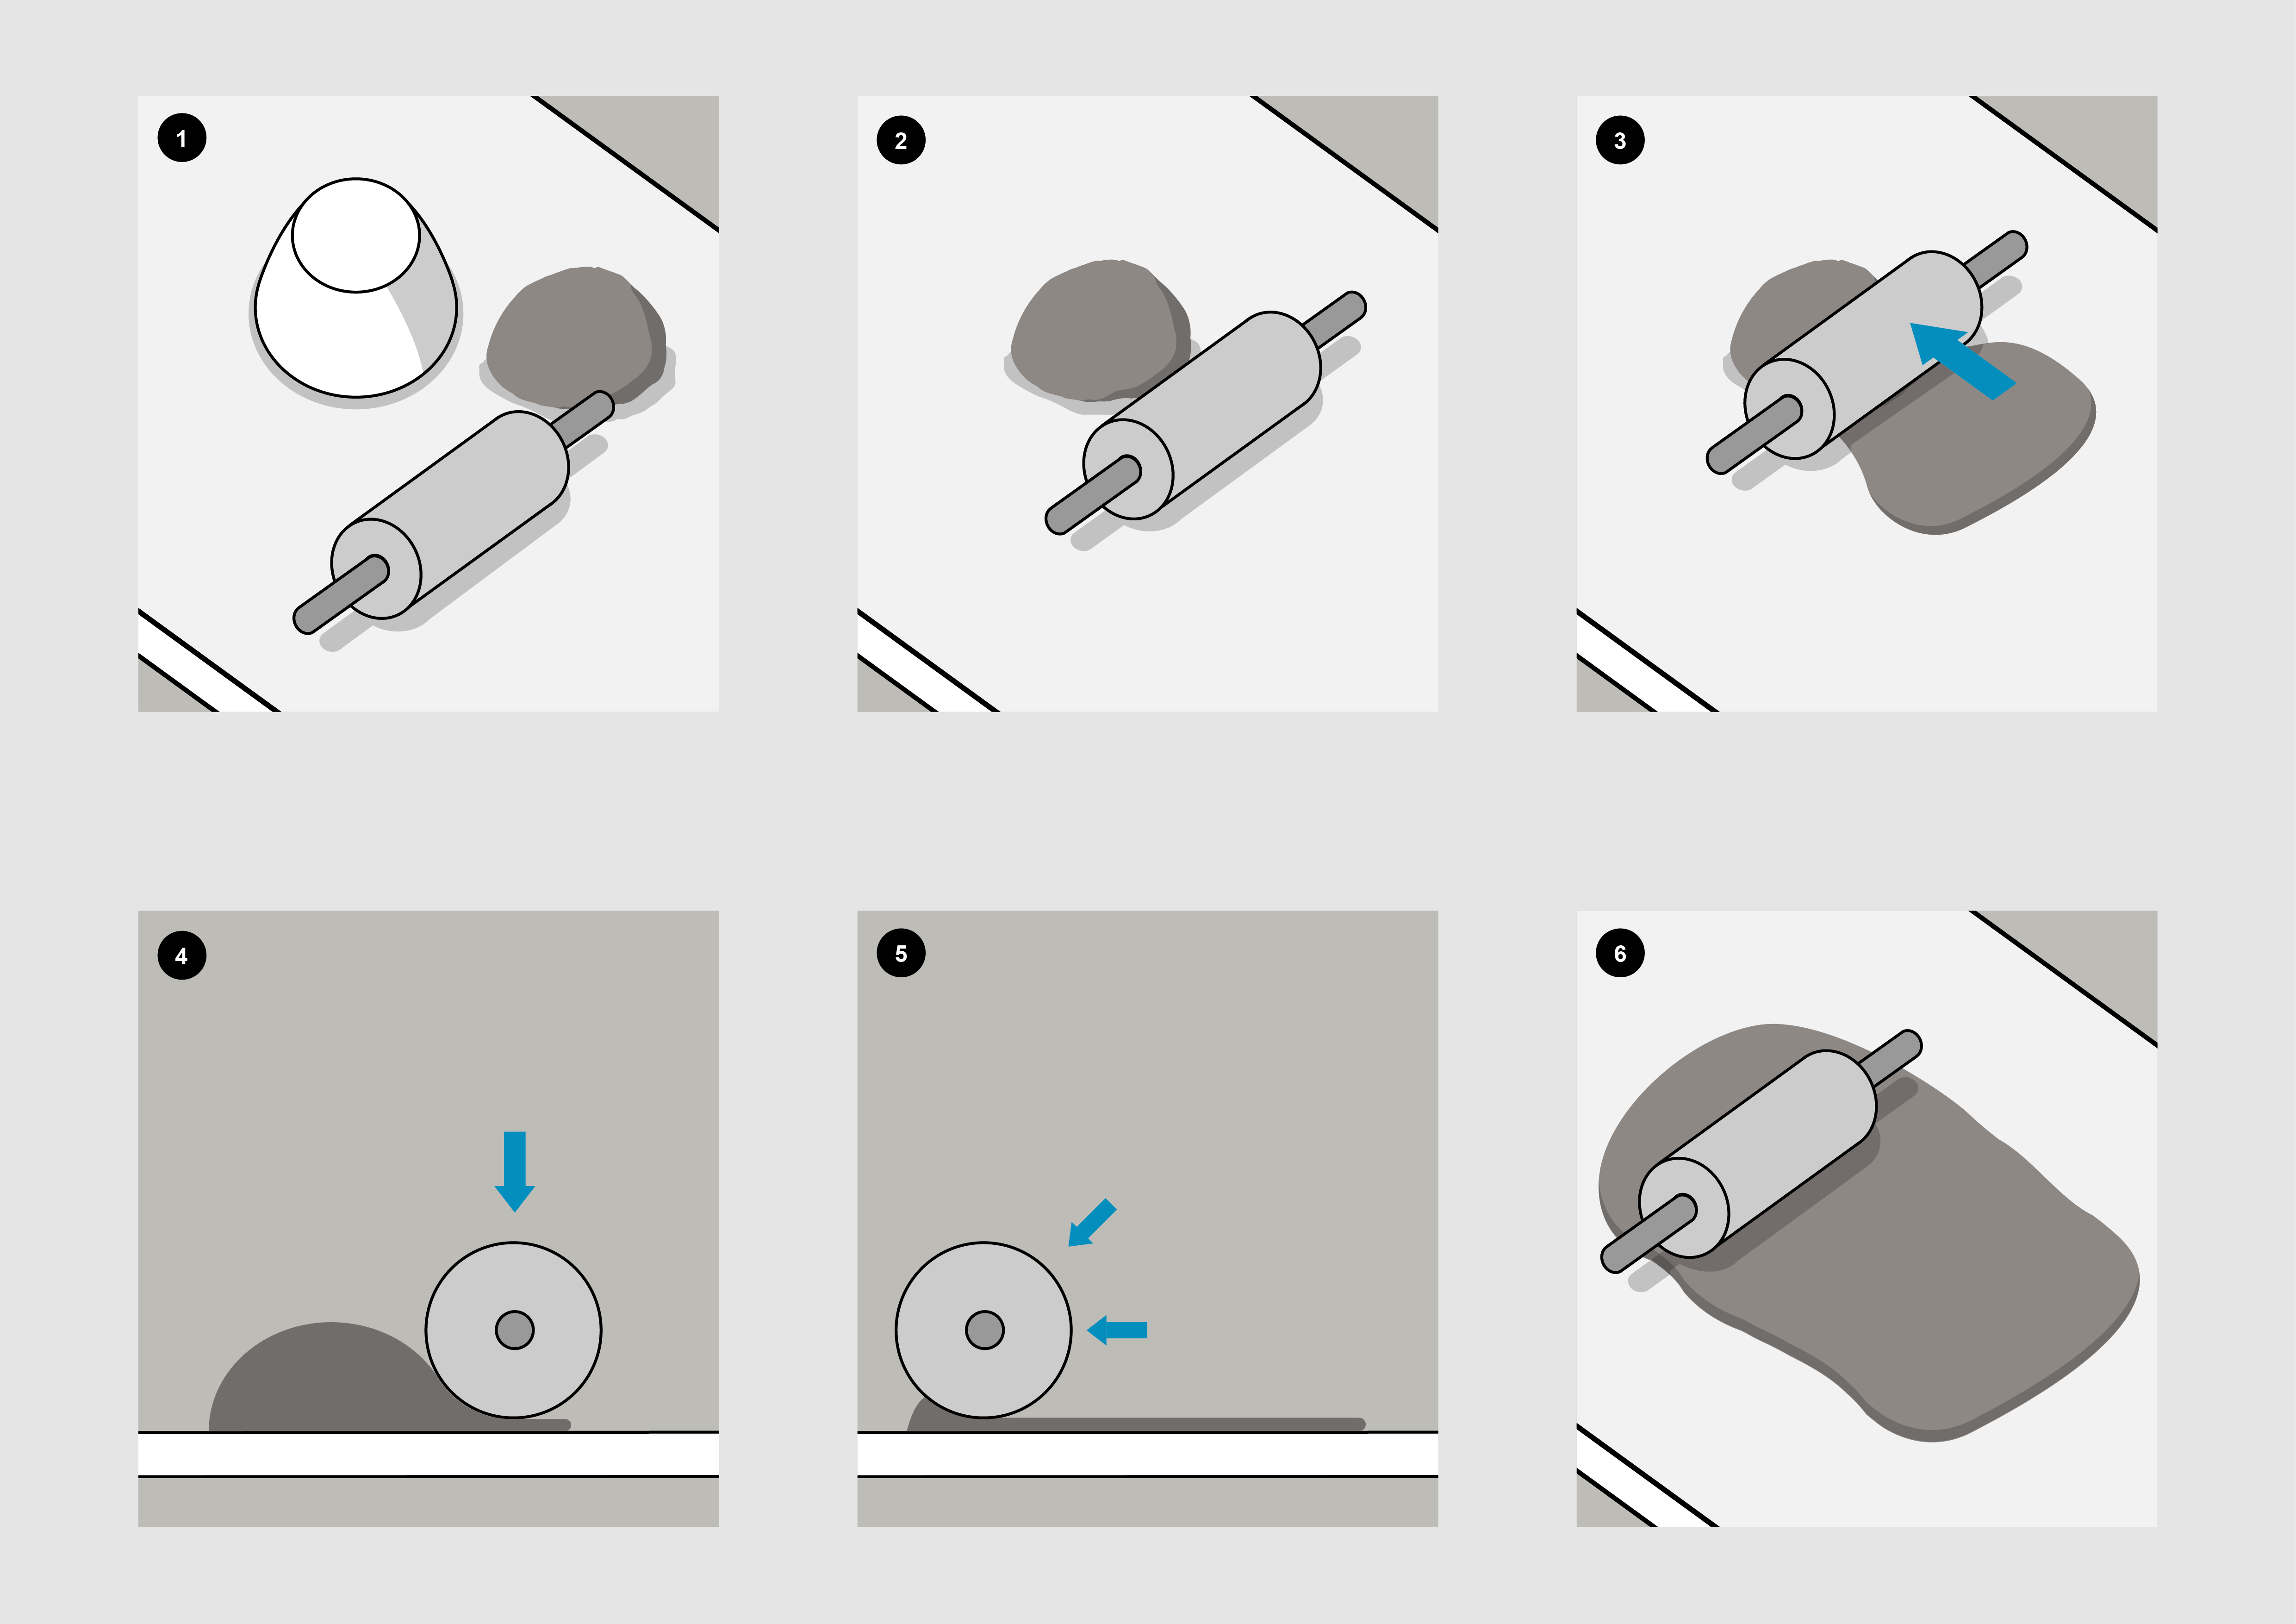
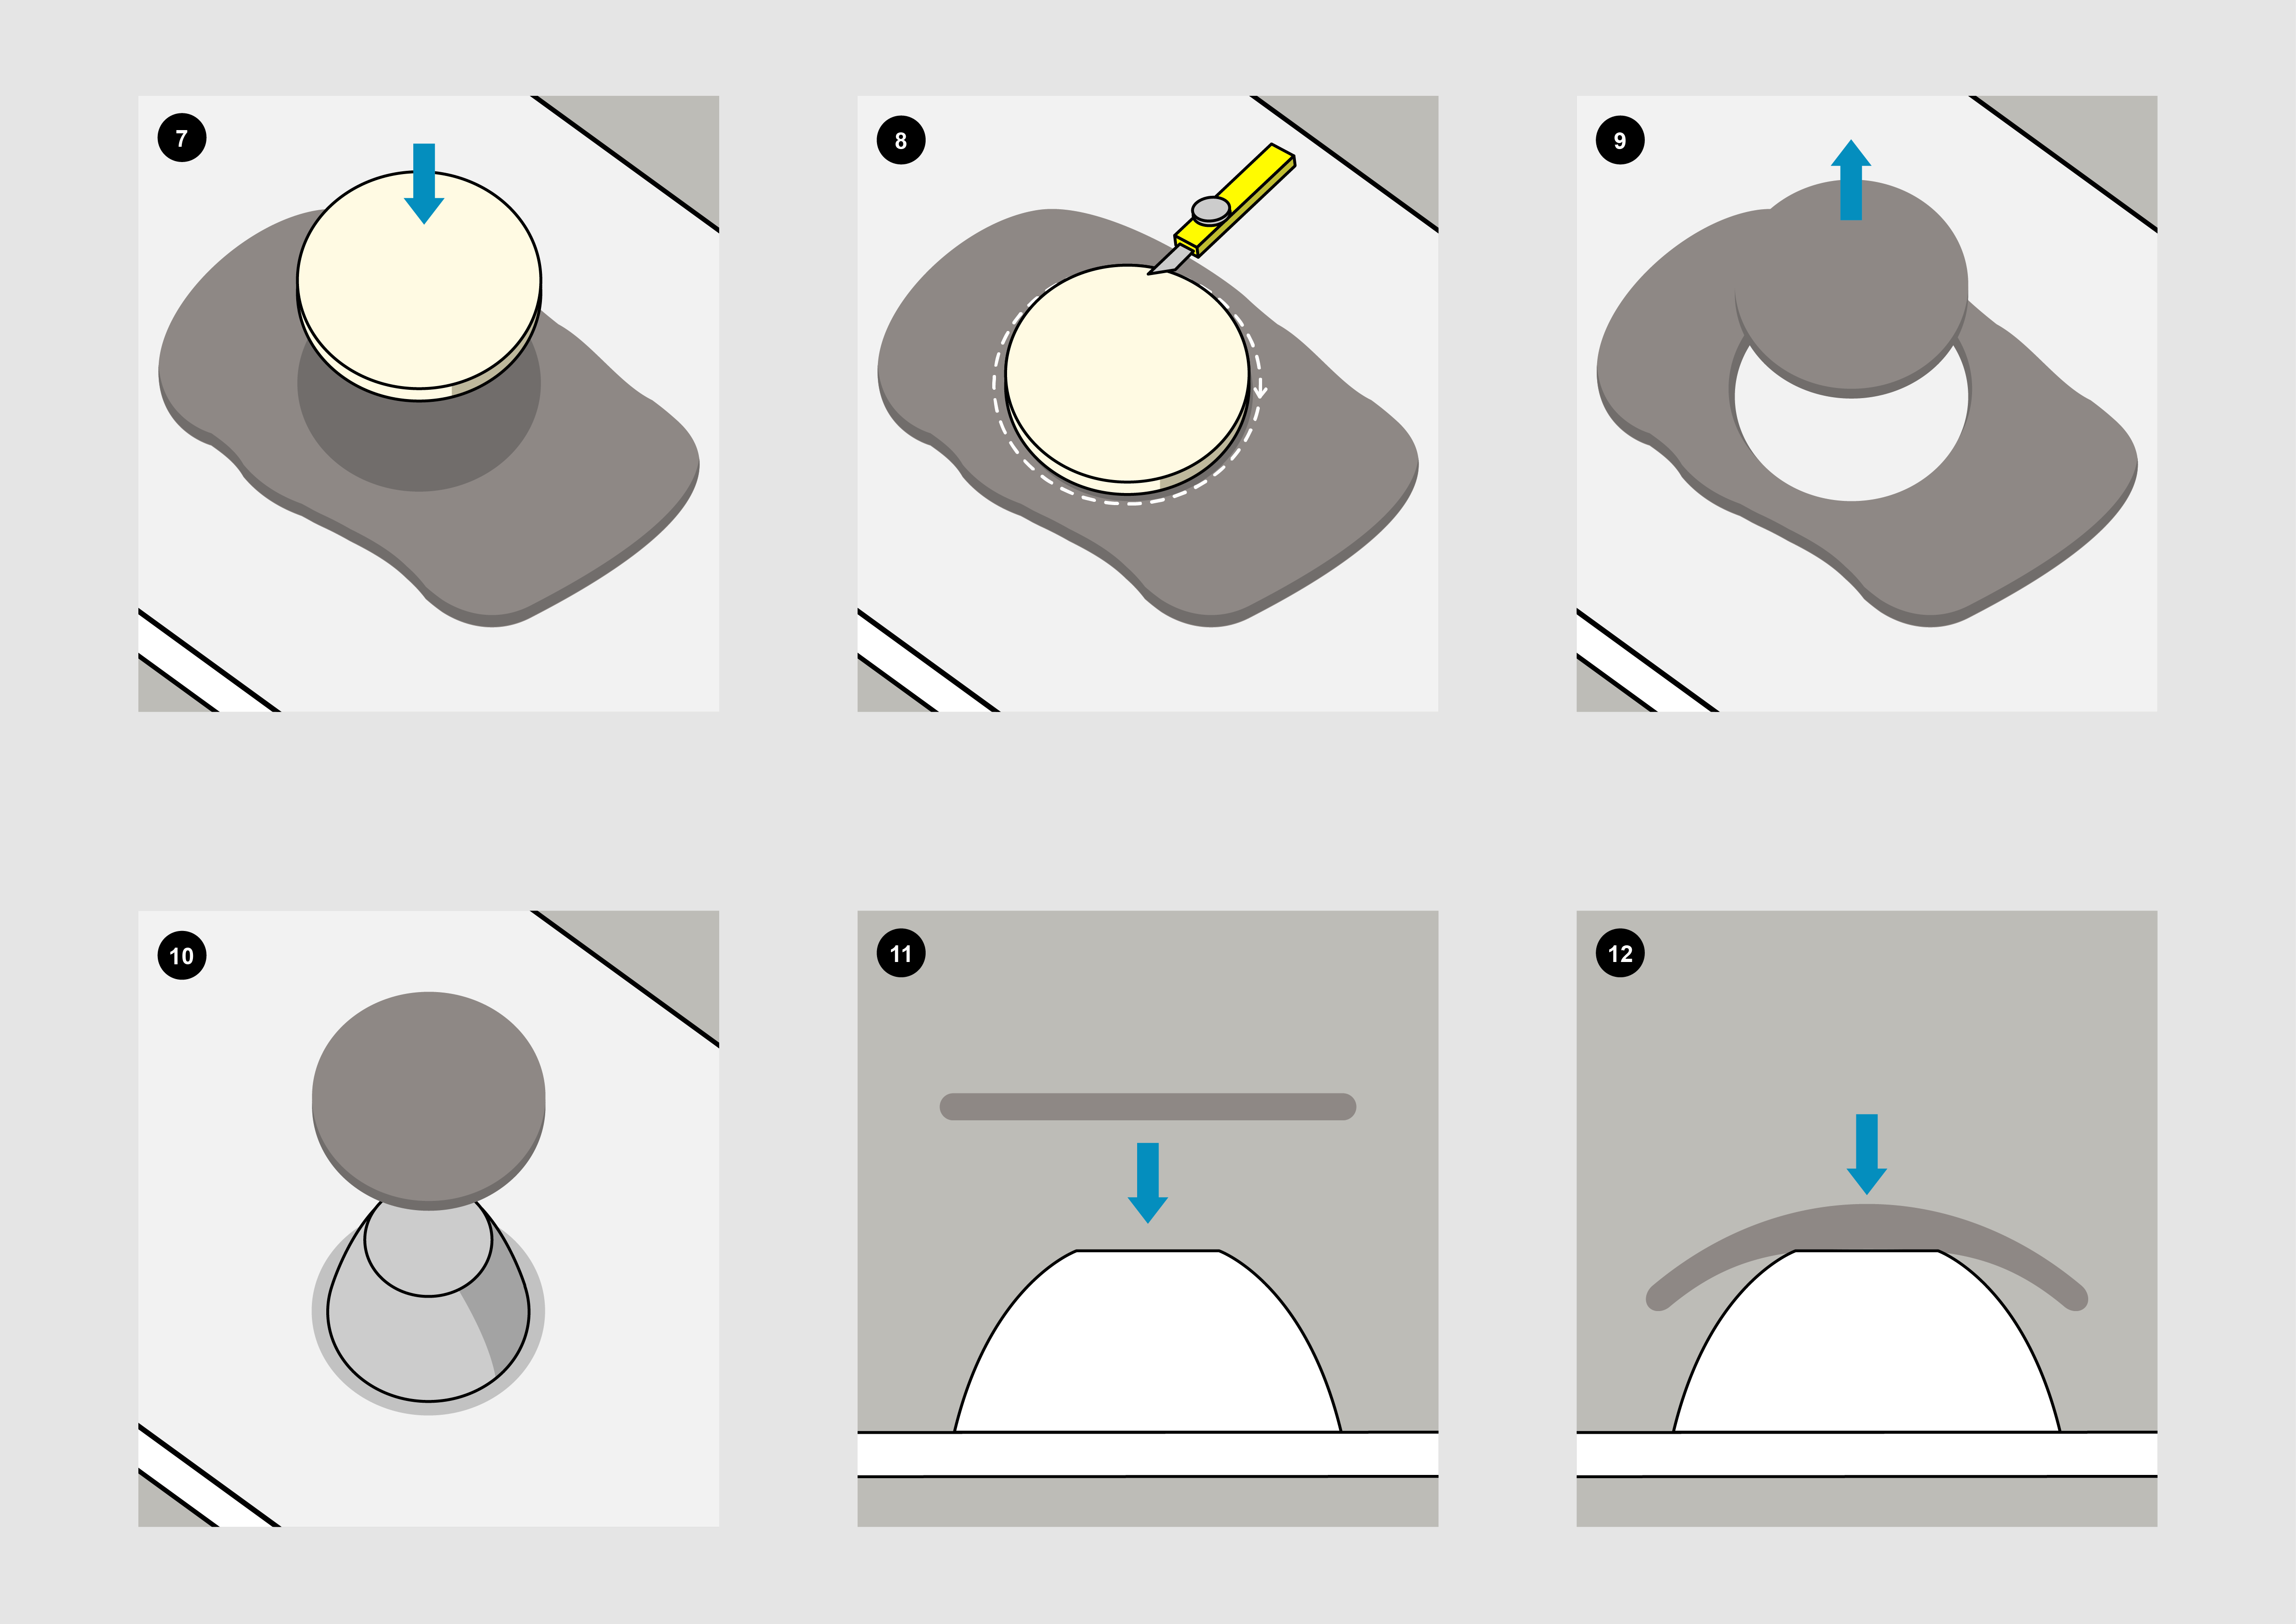
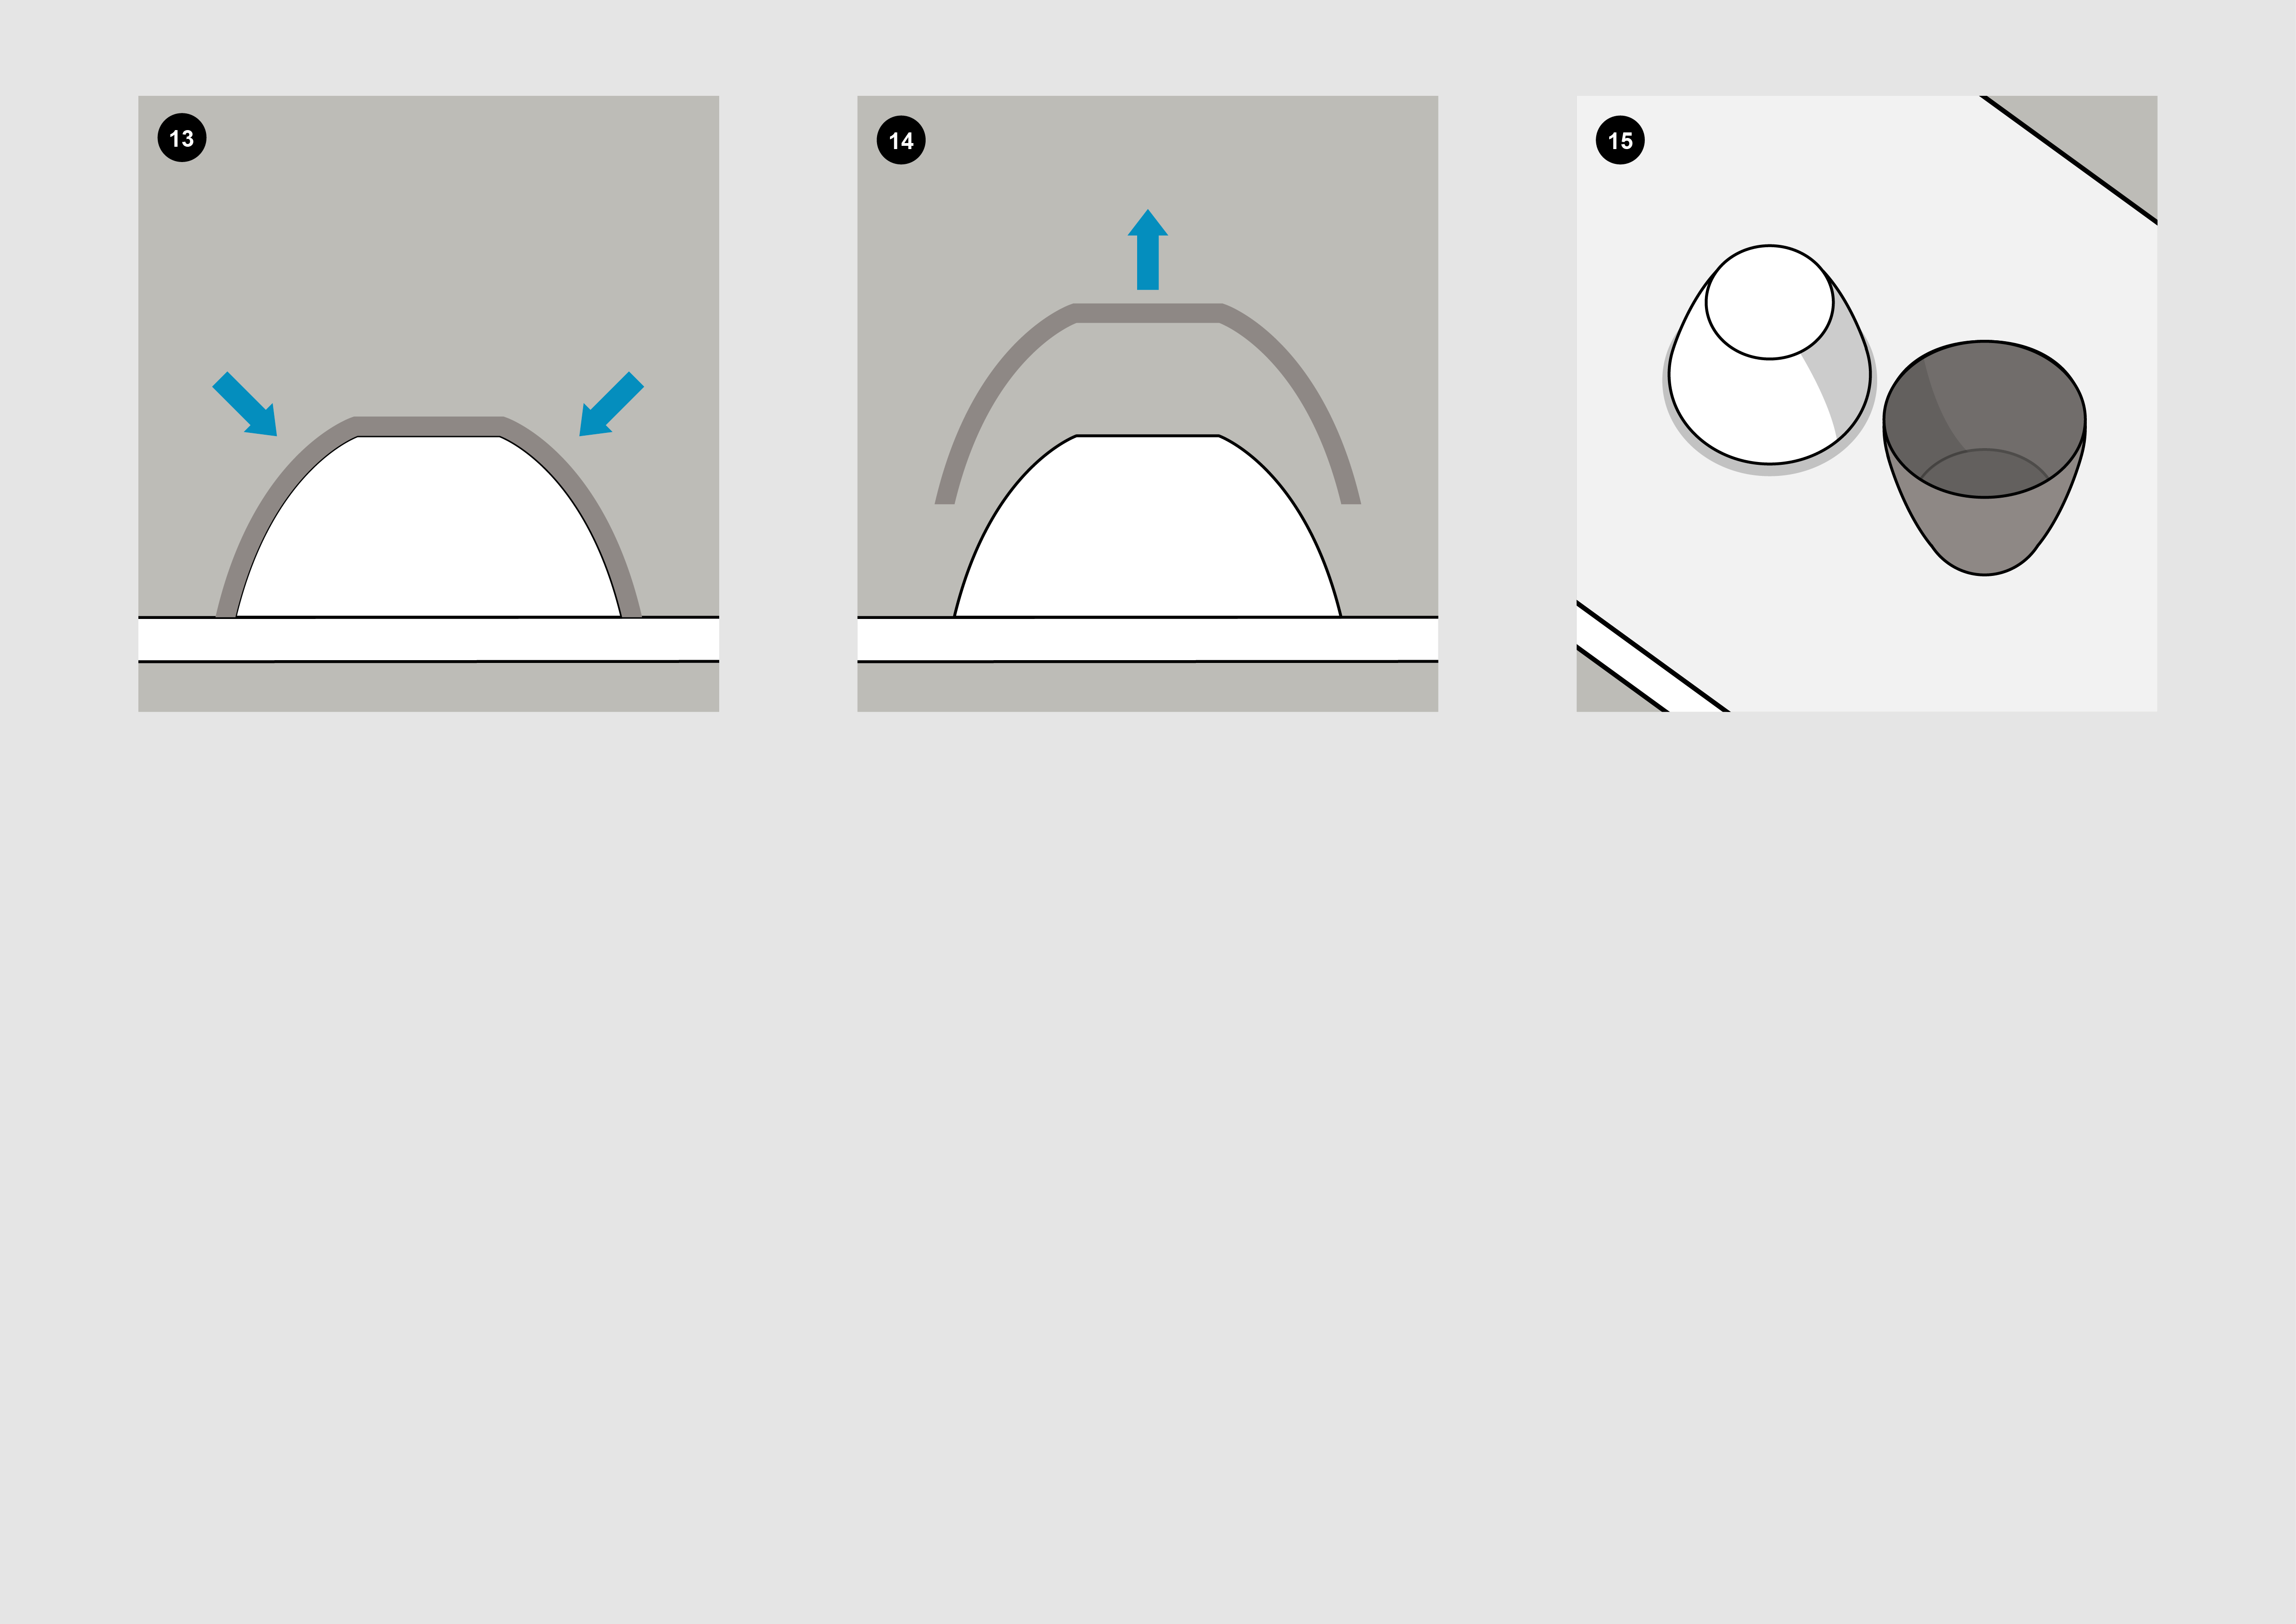
Figure 3. Image series on press molding
1. Press-mold, clay, and a rolling pin
2. The clay must be made in a slab first.
3. A rolling pin or slab-roller can be used.
4.–6. Pressure is applied downwards as the rolling pin is rolled forward to make an even slab.
7.–9. Use a template the same size as press-mold to cut the right shape slab.
10.–13. Place slab on mold and press around plaster slump mold until desired shape is reached.
14.–15. After the clay has dried to leather-hard, it can safely be removed from the press-mold and finished.Jiggering
Jiggering is a manual molding method used in small series production as well as product development. In manual molding, the plaster mold is placed in a metal chuck that rotates during forming. The jiggering blade (wood, plastic, steel) is lowered by hand on the clay piece as the plaster mold rotates. By jiggering, both internal and external molding can be done.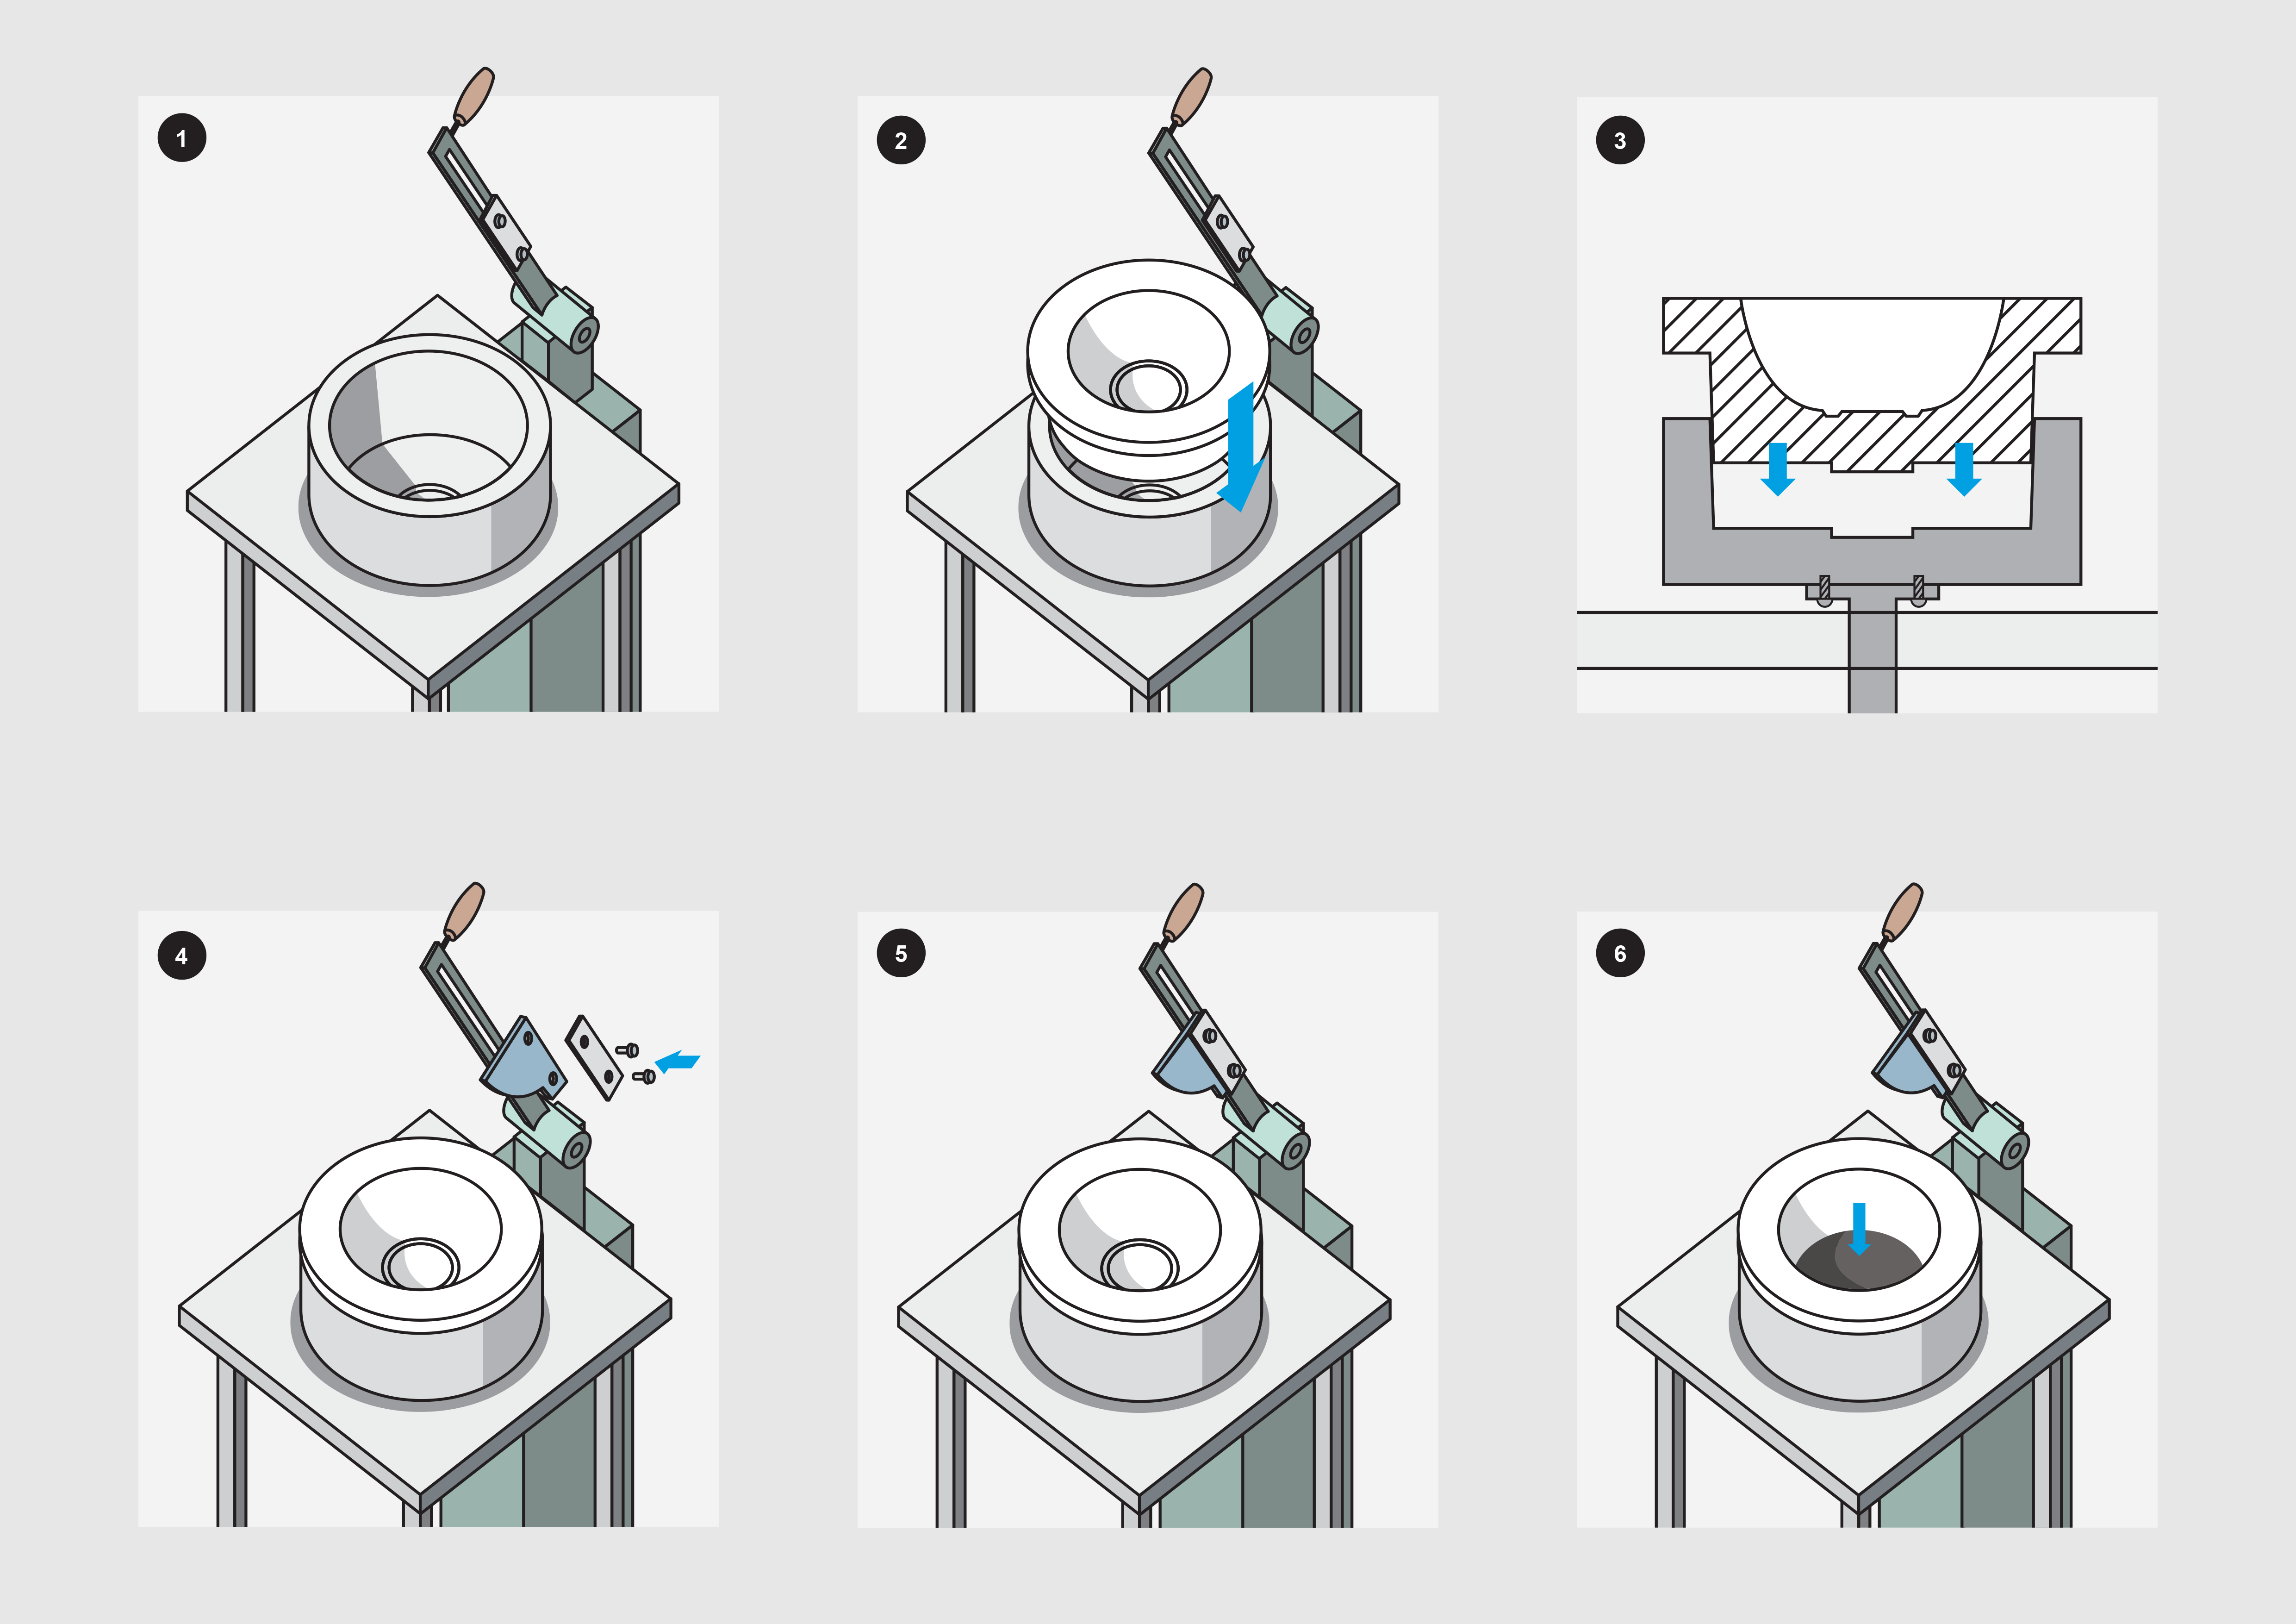
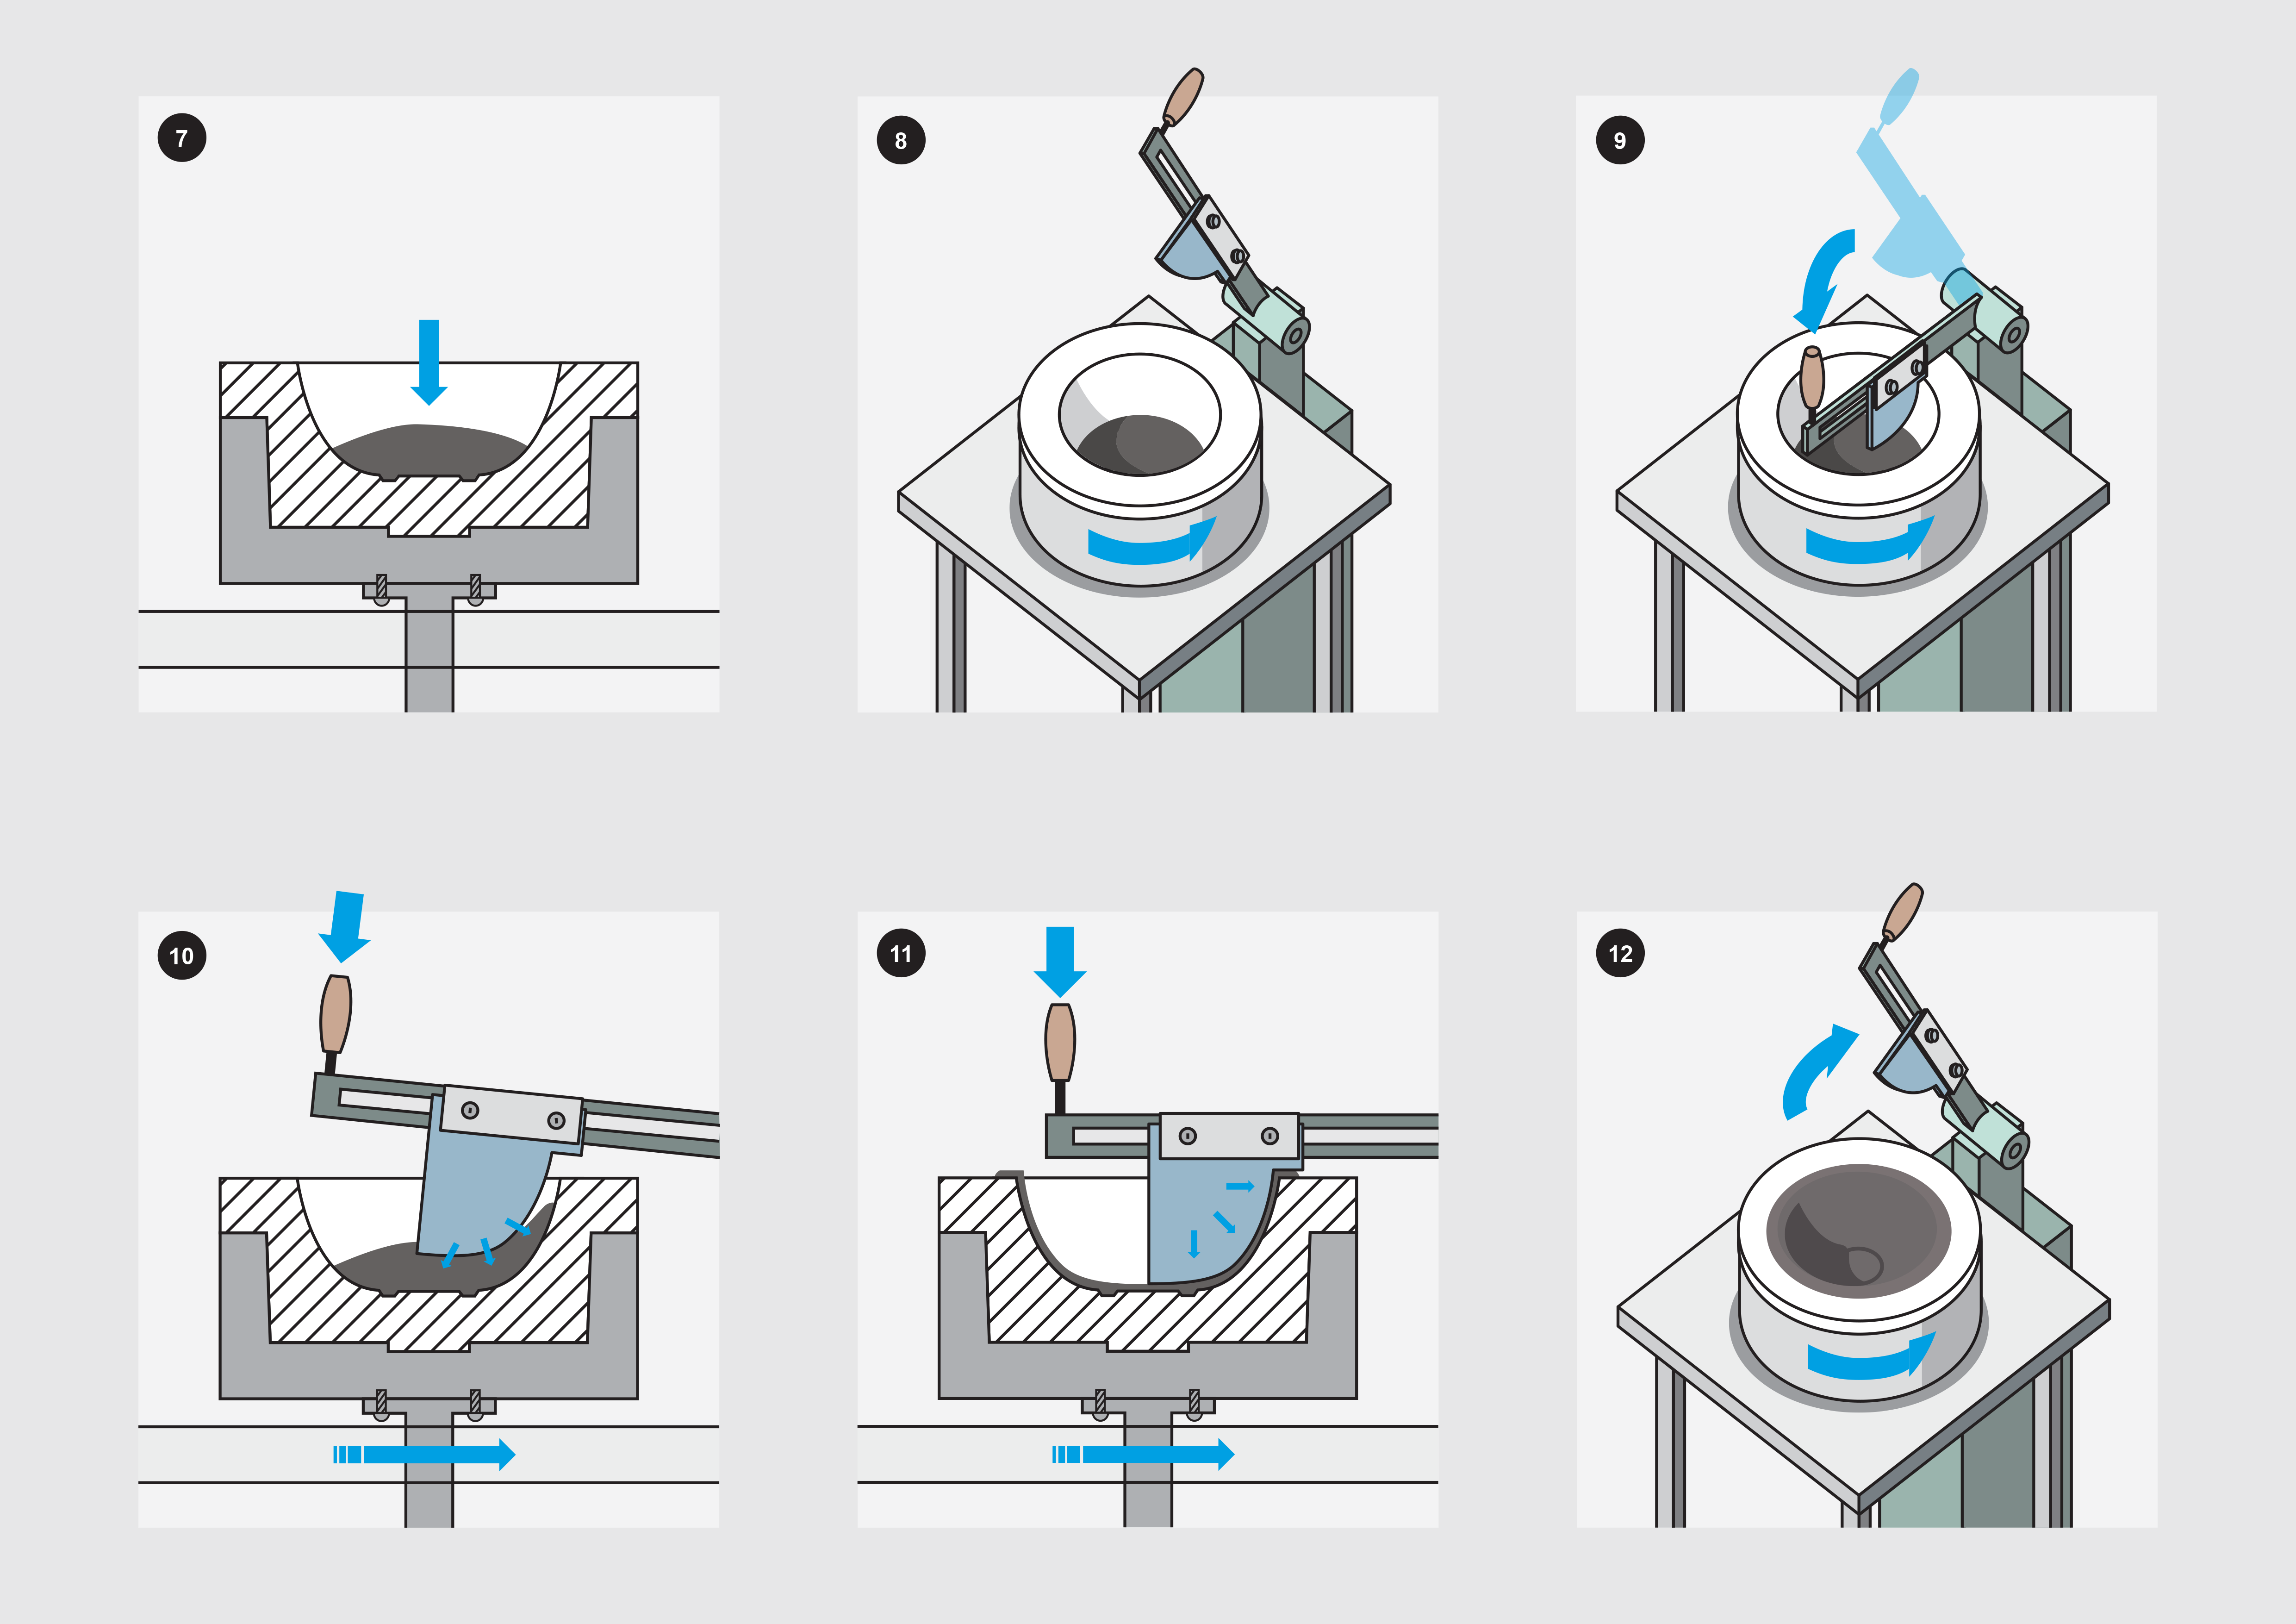
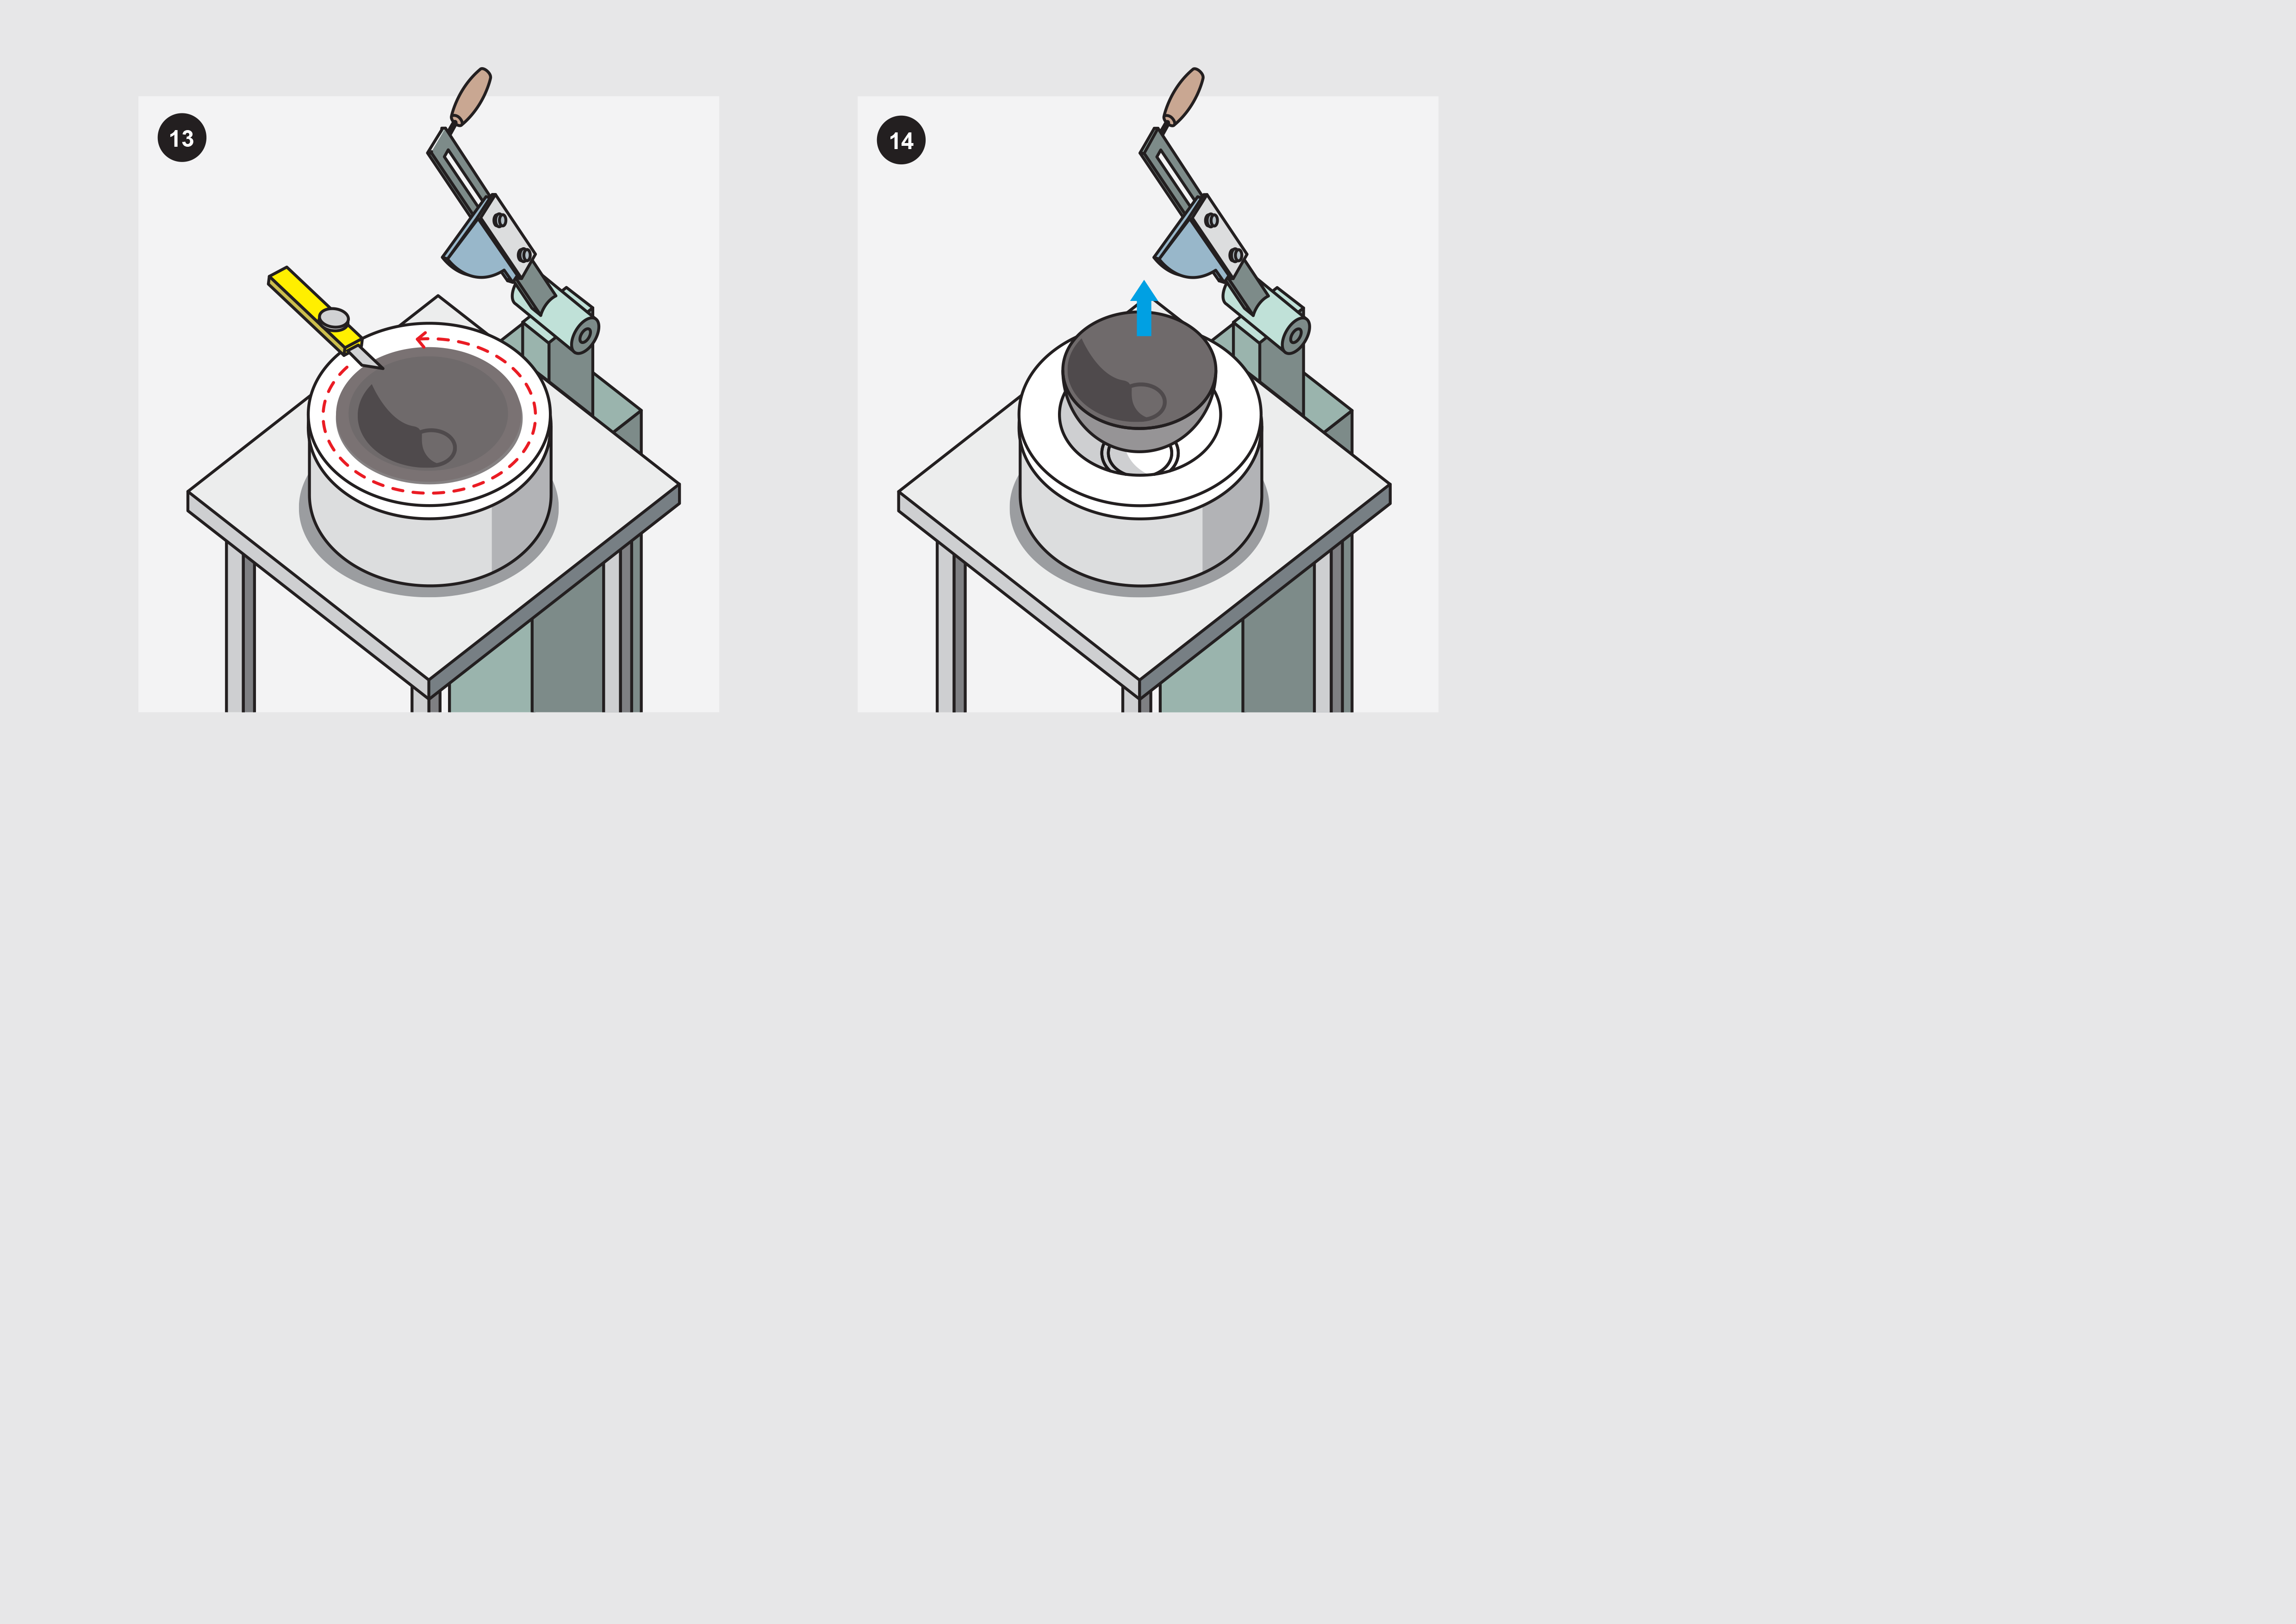
Figure 4. Image series of jiggering technique
1.–3. The plaster mold is placed into the metal chuck.
4.–5. The jiggering blade is fixed at the correct position on the arm. The left edge must meet the middle point exactly.
6.–7. A small piece of plastic clay is placed in the bottom of the mold.
8.–11. As the mold is spinning, the arm with the blade is lowered slowly in steps, each time removing a small amount of clay. The final shape is found when the arm is pushed all the way down to be horizontal.
12.–14. When the form is finished, any excess clay on the top rim of the mold can be cut away. The piece can then be removed from the mold after it has dried and shrunk a bit.
Slip-castingFigure 5. Casting with a plaster mold (animation)
Casting methods are divided into open casting and solid casting. Molds can be single or multi-piece. Casting techniques are used in both small series production and industrial production.
In open casting, the casting mass is poured into a mold where it is allowed to set for a certain period of time. During this time, a solid layer of clay gradually increases in thickness on the inner surface of the mold, as the plaster mold absorbs some of the water contained in the casting slip. The thickness of the clay layer is determined by the length of time of the casting slip in the mold, so that by extending the casting time, the thickness of the layer can be increased. When the desired wall thickness of the object has been reached, i.e. a certain casting time has elapsed, the mold is turned upside down, and the excess slip that is still wet is poured out and the already cast solid object remains inside the mold. The object is left to dry in the mold for some time, during which it solidifies due to the continuous absorbency of the mold. When the drying object shrinks slightly, it can be easily removed from the mold.
In solid casting, both internal and external formation of the object takes place by means of a mold. The mold consists of two halves, inside which the shape of the object to be made is repeated. The molds are filled through the pouring openings in one half so that the space between the molds is filled. The water in the casting slip is absorbed into the mold on two sides and the wall thickness is determined by the mold and not by the casting time used as in open casting.3D printing techniques
3D printing is a material-adding technique in which printing adds material, for example layer by layer or by continuous extrusion. The following is an example of one way to approach clay printing, but there are several different variations and ways. 3D printing is an evolving field and more and more new printers and suitable materials are entering the market.
Printing a piece of clay can be roughly divided into three different work steps. In the first step, a digital file is made of the format of the piece to be printed. For example, Rhinoceros 3D modeling software or other similar CAD software can be used for this. For example, the finished digital file is saved in STL format, after which the modeled format is sliced into layers by another software. The digital file gives the coordinates to the printer, as it moves and prints the media. The second step in the process is printing itself. For extrusion printing, a suitable soft clay must be made that is sufficiently pasty and of uniform quality. The clay can be prepared from start to finish itself or, for example, using ready-made fine clay, to which water is added by hand processing so that the pulp is suitably soft. Printing clay by the extrusion method often requires constant monitoring and, for example, adjustment of the air pressure. During printing, you can still influence the printing process itself, for example by changing the print speed or adjusting the air pressure. However, these possibilities depend on the type of printer you are using. The third step in the process is the finishing step of the printed part, in which the object is dried, finished and fired to the desired temperature in a manner familiar to ceramics.
3D printing involves a wide variety of printing techniques and the extrusion method is just one of them. The clay can also be printed, for example, with a powder printer, which prints the clay powder by layer. Different clay 3D printing methods allow for the application of clay material in dry powder or plastic form. In the stereolithography (SLA) method, the ceramic raw material can be blended with a photopolymer that is photoactive. In the SLA technique, the liquid mixture is added stepwise to the basin, after which the surface of the mixture is cured layer by layer by means of a laser beam.
The 3D printer for ceramics can be thought of as a new kind of tool for craftsmen, designers and artists, which enables e.g. the production of otherwise difficult shapes and the use of new types of material. As a digital tool, a 3D printer is very different from traditional tools in that it is programmed and requires not only knowledge of ceramics, but also different areas of expertise. 3D printing can be approached from a very technical point of view, as it enables, for example, the production of structurally demanding shapes. It can also be used as a handcrafted tool, and approached from an exploratory and experimental perspective.
Video: Ashish Mohite and Priska Falin
References
Brinck, J. (2019). Keramiikan valmistuksen prosessi sekä valmistus- ja koristelutekniikoita [Unpublished teaching material]. Aalto University.
Jylhä-Vuorio, H. (2003). Keramiikan Materiaalit. Kuopio: Taitemia
Lautenbacher, N. (eds.) (2020). Kantava maa. Aalto Arts Books
Lautenbacher, N. (2019). Manufacturing Techniques In Ceramics, Product Design in Ceramics [Unpublished teaching material]. Aalto University.
Pelkonen, T. (2009). Muodonantomenetelmät [Unpublished teaching material]. Aalto University.Reading recommendations
Keep, J. (2020). A Guide to Clay 3D Printing. Retrieved 1.12.2020, http://www.keep-art.co.uk/journal_1.html
Chittenden, T. (2018). Printed pots and computerized coils: The place of 3D printing in ceramic practice. Craft Research, 9 (1), 9-40.
Falin, P., Horsanali, N., Hansen, F. T. & Mäkelä, M. (in press). Practitioners ’Experience in Clay 3D Printing: Metaphorical viewing for gaining embodied understanding. Proceedings of BICCS2021 conference.
Gürsoy, B. (2018). From Control to Uncertainty in 3D Printing with Clay. In Kepczynska-Walczak, A. Bialkowski, S. (Eds.) Proceedings of the 36th eCAADe Conference: Computing for a Better Tomorrow (pp. 21-30).
Hansen, F. T., & Falin, P. (2016). 3D Printing as a Ceramic Craft Tool in Its Own Right. In M. Mäkelä, B. Schmidt, P. Falin and M. Juolahti (Eds.), Ceramics and its Dimensions: Shaping the Future (pp. 114–128). Helsinki: Aalto University.
Hansen, F. T., & Tamke, M. (2019). A Visual Programming Interface as the Common Platform for Sharing Embodied Knowledge. In N. Nimkulrat, K. Kuusk, J. V. Noronha, C. Groth & O. Tomico (Eds.) Proceedings of EKSIG2019: Knowing Together: Experiential knowledge and Collaboration (pp. 56-70).
Images and illustrations
Figure 1. Kerimov, N. (2020). Ceramic making process. [Illustration].
Figure 2. Kinnunen, A. (2020). Clay wedging. [Photo].
Figure 3. Kerimov, N. (2020). Image series on press molding. [Illustration].
Figure 4. Kerimov, N. (2020). Image series of jiggering technique. [Illustration].
Figure 5. Kerimov, N. (2020). Casting with a plaster mold. [Animation].Videos
Latva-Somppi, A., Visuri, K., Aalto ARTS & Hauru I-M., Aalto Studios & Guseva, Y., Aalto Online learning (2020)